Download apk beautifulsms_Ver1.04.apk free for your android tablet
beautiful sms ver 1.04 apk
download link : mediafire
Selasa, 31 Mei 2011
Download beautifulsms_Ver1.02.apk free
Download apk beautifulsms_Ver1.02.apk for your android tablet free
download link: mediafire
download link: mediafire
Download beautifulsms_Ver1.01.apk free
Download apk beautifulsms_Ver1.01.apk for your android tablet free
Download link: mediafire
Download link: mediafire
Download beautifulsms_Ver1.0.apk free
Download apk beautifulsms_Ver1.0.apk for your android tablet
download link: mediafire
download link: mediafire
Secret Code Samsung Android Phone
*#*#4636#*#* phone information
*2767*3855# hard reset
*#*#7780#*#* factory reset
*#*#7594#*#* change end call/power option
*#*#197328640#*#* service mode
*#*#273283*255*663282*#*#* file copy screen (backup media files)
*#*#526#*#* wlan test
*#*#232338#*#* shows wifi mac address
*#*#1472365#*#* gps test
*#*#1575#*#* another gps test
*#*#232331#*#* bluetooth test
*#*#232337#*# shows bluetooth
Tutorial rooting & unlock bootloader for Nexus sAMOLED/I9020
required :
•Android 2.3 SDK -> http://developer.android.com/sdk/index.html
•PDAnet -> http://www.junefabrics.com/android/download.php
•Clockwork Recovery Image -> http://www.koushikdutta.com/2010/02/clockwork-recovery-image.html (select nexus s)
•Superuser -> http://forum.xda-developers.com/showthread.php?t=682828
•USB Driver
1. Install Android SDK on pc / laptop then run SDK manager, there'll
Minggu, 29 Mei 2011
download ADC2_seeknspell.apk free
download apk ADC2_seeknspell.apk for your android tablet
download link: mediafire
download link: mediafire
Dell Streak
Dell Streak (before known as Mini 5) is a hybrid between the smartphones with the tablet PC from Dell that uses Android as the operating system. Dell Streak has a 5 inch screen sizes with capasitive touchscreen, and 2 cameras, 5 megapixel with dual-LED flash on the back and VGA resolution camera on the front for video calling, where both cameras have the capability to record video. With its
CSL Blueberry Mi410 (rebrand from Huawei U9000 IDEOS X6)
Complete Specifications Mi-410 CSL BlueberryGeneral2G Network GSM 850 / 900 / 1800 / 19003G Network HSDPA 850 / 1900 / 2100 / AWSHSDPA 900 / 1900 / 2100 / AWS
SizeDimensions 122 x 66 x 10 mmWeight 143 g
Display _CSL Blueberry Mi 410_Capacitive touchscreen TFT, 16M colorsSize 480 x 800 pixels, 4.1 inches- Accelerometer sensor for auto-rotate- Touch-sensitive controls- Proximity sensor for auto
SizeDimensions 122 x 66 x 10 mmWeight 143 g
Display _CSL Blueberry Mi 410_Capacitive touchscreen TFT, 16M colorsSize 480 x 800 pixels, 4.1 inches- Accelerometer sensor for auto-rotate- Touch-sensitive controls- Proximity sensor for auto
CSL BlueBerry SPICE Mi320
CSL Blueberry Mi320 Specifications* Network:
-GSM / GPRS / EDGE / UMTS / HSDPA / HSUPA (HSPA + support);
- GSM bands: 850/900/1800/1900;
- UMTS bands: 850/1700/1900/2100 or 900/1700/1900/2100;
* Size and Weight: Height 116 mm, width 60 mm, thickness 11.95 mm, Weight: 120g;
* Connectivity: Bluetooth 3.0, WiFi: 802.11b / g, GPRS Class 12, EDGE Multi-slot Class 12, 3G HSDPA Up to 14.4 Mbps;
*
Sabtu, 28 Mei 2011
download ADC2_ilomo_Ver1.apk free
download apk ADC2_ilomo_Ver1.apk for your android tablet free
download link : mediafire
download link : mediafire
CAUTION! 21 Apps in Android Market Is Malware
Google has just withdraw 21 applications from the Android Market. According to Google, all applications were suspected as malware designed to gain root access from Android devices owned by users. Access was then used to retrieve various types of data and thereafter used to download some code. Unfortunately, users do not know if there is a 'thief' in the Android device they uses.
Although Google
Although Google
Samsung Galaxy S
Technical Specification : here
FAQ about xda developer
Q1 : What is the ROM or Firmware?
A1 : ROM or Firmware is software that contains the operating system that runs on our mobile phones. In this case is the Google Android Eclair version 2.1, Froyo version 2.2 and version 2.3 Gingerbread
Q2 : Can I update my firmware SGS without having to service center?
A2 : Yes. For ordinary users, the
Jumat, 27 Mei 2011
How TO create Time Chart Using 3rd party API in Android
Creating Time Chart( graph ) in Android
Time chart

Find out below links for source :
====================
1 -> Timechart Source Code
2-> Jar files for Graphs
3-> Documentation for Jar files
Time chart

Find out below links for source :
====================
1 -> Timechart Source Code
2-> Jar files for Graphs
3-> Documentation for Jar files
Kamis, 26 Mei 2011
How Create Pie Chart In Android
In Genearl Graphs Play very important role , but in android we don't have any Graphs related API .
But with the help of general android api we can generate pie charts .
files
====
main.xml ( view purpose)
main.java ( main class )
view_piechart.java ( pie chart properties)
piedetailsitem.java ( attributes)
main.xml
-----------
<?xml version="1.0" encoding="utf-8"?>
<RelativeLayout xmlns:android="http://schemas.android.com/apk/res/android"
android:orientation="vertical" android:layout_width="fill_parent"
android:layout_height="fill_parent">
<LinearLayout android:id="@+id/pie_container"
android:layout_width="fill_parent" android:layout_height="wrap_content"
android:orientation="vertical">
</LinearLayout>
<TextView android:id="@+id/tvAndroid" android:layout_width="110dip"
android:layout_height="wrap_content" android:layout_below="@+id/pie_container"
android:text="Android" android:padding="10dip" android:textStyle="bold"
android:background="#444544" android:layout_marginTop="200dip" />
<TextView android:id="@+id/tvIphone" android:layout_width="110dip"
android:layout_height="wrap_content" android:layout_below="@+id/pie_container"
android:layout_toRightOf="@+id/tvAndroid" android:text="IPhone"
android:padding="10dip" android:textStyle="bold" android:background="#878887"
android:layout_marginTop="200dip" />
<TextView android:id="@+id/tvBlackBerry" android:layout_width="110dip"
android:layout_height="wrap_content" android:layout_below="@+id/pie_container"
android:layout_toRightOf="@+id/tvIphone" android:text="BlackBerry"
android:padding="10dip" android:textStyle="bold" android:background="#98967F"
android:layout_marginTop="200dip" />
<TextView android:id="@+id/tvNokia" android:layout_width="160dip"
android:layout_height="wrap_content" android:layout_below="@+id/tvBlackBerry"
android:layout_toRightOf="@+id/tvSamsung" android:text="Others"
android:padding="10dip" android:textStyle="bold" android:background="#A1A1A1" />
<TextView android:id="@+id/tvSamsung" android:layout_width="160dip"
android:layout_height="wrap_content" android:layout_below="@+id/tvAndroid"
android:text="Nokia" android:padding="10dip" android:textStyle="bold"
android:background="#0000FF" />
</RelativeLayout>
main.java
-----------
package sra.chart;
import java.util.ArrayList;
import java.util.List;
import android.app.Activity;
import android.graphics.Bitmap;
import android.graphics.Canvas;
import android.os.Bundle;
import android.view.ViewGroup.LayoutParams;
import android.widget.ImageView;
import android.widget.LinearLayout;
public class Main extends Activity {
List<PieDetailsItem> piedata = new ArrayList<PieDetailsItem>(0);
@Override
public void onCreate(Bundle savedInstanceState) {
super.onCreate(savedInstanceState);
setContentView(R.layout.main);
PieDetailsItem item;
int maxCount = 0;
int itemCount = 0;
int items[] = { 20, 40, 10, 15, 5 };
int colors[] = { -6777216, -16776961, -16711681, -12303292, -7829368 };
String itemslabel[] = { " vauesr ur 100", " vauesr ur 200",
" vauesr ur 300", " vauesr ur 400", " vauesr ur 500" };
for (int i = 0; i < items.length; i++) {
itemCount = items[i];
item = new PieDetailsItem();
item.count = itemCount;
item.label = itemslabel[i];
item.color = colors[i];
piedata.add(item);
maxCount = maxCount + itemCount;
}
int size = 155;
int BgColor = 0xffa11b1;
Bitmap mBaggroundImage = Bitmap.createBitmap(size, size,
Bitmap.Config.ARGB_8888);
View_PieChart piechart = new View_PieChart(this);
piechart.setLayoutParams(new LayoutParams(size, size));
piechart.setGeometry(size, size, 2, 2, 2, 2, 2130837504);
piechart.setSkinparams(BgColor);
piechart.setData(piedata, maxCount);
piechart.invalidate();
piechart.draw(new Canvas(mBaggroundImage));
piechart = null;
ImageView mImageView = new ImageView(this);
mImageView.setLayoutParams(new LayoutParams(LayoutParams.WRAP_CONTENT,
LayoutParams.WRAP_CONTENT));
mImageView.setBackgroundColor(BgColor);
mImageView.setImageBitmap(mBaggroundImage);
LinearLayout finalLayout = (LinearLayout) findViewById(R.id.pie_container);
finalLayout.addView(mImageView);
}
}
view_piechart.java
------------------
package sra.chart;
import java.util.List;
import android.content.Context;
import android.graphics.Canvas;
import android.graphics.Paint;
import android.graphics.RectF;
import android.util.AttributeSet;
import android.util.Log;
import android.view.View;
public class View_PieChart extends View
{
public static final int WAIT = 0;
public static final int IS_READY_TO_DRAW = 1;
public static final int IS_DRAW = 2;
private static final float START_INC = 30;
private Paint mBagpaints = new Paint();
private Paint mLinePaints = new Paint();
private int mWidth;
private int mHeight;
private int mGapTop;
private int mGapBottm;
private int mBgcolor;
private int mGapleft;
private int mGapright;
private int mState = WAIT;
private float mStart;
private float mSweep;
private int mMaxConnection;
private List<PieDetailsItem> mdataArray;
public View_PieChart(Context context) {
super(context);
Log.w(" single cons ", " single cons");
}
public View_PieChart(Context context, AttributeSet attr) {
super(context, attr);
Log.w(" double cons ", " double cons");
}
@Override
protected void onDraw(Canvas canvas) {
super.onDraw(canvas);
if (mState != IS_READY_TO_DRAW) {
return;
}
canvas.drawColor(mBgcolor);
mBagpaints.setAntiAlias(true);
mBagpaints.setStyle(Paint.Style.FILL);
mBagpaints.setColor(0x88FF0000);
mBagpaints.setStrokeWidth(0.0f);
mLinePaints.setAntiAlias(true);
mLinePaints.setColor(0xff000000);
mLinePaints.setStrokeWidth(3.0f);
mLinePaints.setStyle(Paint.Style.STROKE);
RectF mOvals = new RectF(mGapleft, mGapTop, mWidth - mGapright, mHeight
- mGapBottm);
mStart = START_INC;
PieDetailsItem item;
for (int i = 0; i < mdataArray.size(); i++) {
item = (PieDetailsItem) mdataArray.get(i);
mBagpaints.setColor(item.color);
mSweep = (float) 360* ((float) item.count / (float) mMaxConnection);
canvas.drawArc(mOvals, mStart, mSweep, true, mBagpaints);
canvas.drawArc(mOvals, mStart, mSweep, true, mLinePaints);
mStart = mStart + mSweep;
}
mState = IS_DRAW;
}
public void setGeometry(int width, int height, int gapleft, int gapright,
int gaptop, int gapbottom, int overlayid) {
mWidth = width;
mHeight = height;
mGapleft = gapleft;
mGapright = gapright;
mGapBottm = gapbottom;
mGapTop = gaptop;
}
public void setSkinparams(int bgcolor) {
Log.w(" Set bg color : ", bgcolor + "");
mBgcolor = bgcolor;
}
public void setData(List<PieDetailsItem> data, int maxconnection) {
mdataArray = data;
mMaxConnection = maxconnection;
Log.w(" Max Connection ", maxconnection + " " + " Adataarray :"
+ data.toString());
mState = IS_READY_TO_DRAW;
}
public void setState(int state) {
mState = state;
}
public int getColorValues(int index) {
if (mdataArray == null) {
return 0;
}
else if (index < 0)
return ((PieDetailsItem) mdataArray.get(0)).color;
else if (index > mdataArray.size())
return ((PieDetailsItem) mdataArray.get(mdataArray.size() - 1)).color;
else
return ((PieDetailsItem) mdataArray.get(mdataArray.size() - 1)).color;
}
}
Piedetails.item.java
------------------------package sra.chart;
public class PieDetailsItem {
public int count, color;
public float percent;
public String label;
}

final Out Put
For Source ClickHere
Rabu, 25 Mei 2011
Get up to 50% more battery life on your Iconia Tab (Wifi Only)
Hello world!
Attention: This works only with the "Wifi Only" version!
Your IconiaTab has only a battery life about 6-8h? Do you want a battery life of about 10-12h?
Just follow this easy steps:
You need ROOT to do this (click here if you don't have root)and must have a ROOT enabled file browser (click) to make the changes...
1.) Open Rootexplorer (or similar)
2.) Find/Locate the directory /system/app and find the PHONE.APK and the TELEPHONYPROVIDER.APK
3.) Rename the files (e.g. PHONE.OLD and TELEPHONY.OLD)
4.) Reboot your IconiaTab and your finished!
DONT FORGET TO MAKE A BACKUP OF YOUR FILES BEFORE DOING ANYTHING!!!
***IF YOU NEED TO FACTORY RESET YOU WILL HAVE TO REPLACE/RESTORE THESE FILES OR YOU WILL BE STUCK AT THE START SCREEN!!! I am not responsible if you brick your device!!! ***
greets
Adrian
Honeycomb-What else?
Hi there,
as many of you guys out there know, did I have an iPad & an iPad2...The good news about it: I've sold both now, and I've got an Acer Iconia Tab now! So stay tuned for some Honeycomb-Action!
greets
Adrian
as many of you guys out there know, did I have an iPad & an iPad2...The good news about it: I've sold both now, and I've got an Acer Iconia Tab now! So stay tuned for some Honeycomb-Action!
greets
Adrian
Senin, 23 Mei 2011
Android Shell Commands
Here you can find the available command set in the shell by typing this at the android shell prompt:
dumpcrash, am, dumpstate, input, itr, monkey, pm, svc, ssltest,
debuggerd, dhcpcd, hostapd_cli, fillup, linker, logwrapper, telnetd, iftop, mkdosfs, mount,
mv, notify, netstat, printenv, reboot, ps, renice, rm, rmdir,rmmod, sendevent, schedtop,
ping, sh, hciattach, sdptool, logcat, servicemanager, dbus-daemon, debug_tool, flash_image, installd,
dvz, hostapd, htclogkernel, mountd, qemud, radiooptions, toolbox, hcid,
route, setprop, sleep, setconsole, smd, stop, top, start, umount,
vmstat, wipe, watchprops, sync, netcfg, Chmod, date, dd, cmp, cat, dmesg, df,
getevent, getprop, hd, id, ifconfig, insmod, ioctl, kill,
ln, log, lsmod, ls, mkdir, dumpsys, service, playmp3, sdutil,
rild, dalvikvm, dexopt, surfaceflinger, app_process, mediaserver, system_server,
Minggu, 22 Mei 2011
Combine two images in android java
In this blog we are combine two images and we have two images stored locally on an SD card or drawble folder in android.
Steps:
Read the image from Source
InputStream istream = context.getResources().openRawResource(R.drawable.img1);
try {
image1 = BitmapFactory.decodeStream(istream);
istream = context.getResources().openRawResource(R.drawable.img2);
image2 = BitmapFactory.decodeStream(istream);
} finally {
try {
istream.close();
} catch (IOException e) {
}
}
Define the Image property
int width = 0, height = 0;
if (c.getWidth() > s.getWidth()) {
width = c.getWidth();
height = c.getHeight() + s.getHeight();
} else {
width = s.getWidth();
height = c.getHeight() + s.getHeight();
}
Create your target Bitmap,
Bitmap combinedImages = Bitmap.createBitmap(width * 2, height, Bitmap.Config.ARGB_8888);
Create a Canvas for it,
Canvas comboImage = new Canvas(combinedImages);
Use Canvas.drawBitmap to blit each source bitmap into your target bitmap
comboImage.drawBitmap(image1, 0f, 0f, null);
comboImage.drawBitmap(image2, 0f, image1.getHeight()+1, null);
Example:
public Bitmap combineImages(Context context, int img1, int img2) {
// Bitmap[] mBitmap = new Bitmap[6];
Bitmap image1, image2;
InputStream istream = context.getResources().openRawResource(img1);
try {
image1 = BitmapFactory.decodeStream(istream);
istream = context.getResources().openRawResource(img2);
image2 = BitmapFactory.decodeStream(istream);
} finally {
try {
istream.close();
} catch (IOException e) {
}
}
int width = 0, height = 0;
if (c.getWidth() > s.getWidth()) {
width = c.getWidth();
height = c.getHeight() + s.getHeight();
} else {
width = s.getWidth();
height = c.getHeight() + s.getHeight();
}
Bitmap combinedImages = null;
combinedImages = Bitmap
.createBitmap(width * 2, height, Bitmap.Config.ARGB_8888);
Canvas comboImage = new Canvas(combinedImages);
comboImage.drawBitmap(c, 0f, 0f, null);
comboImage.drawBitmap(s, 0f, c.getHeight()+1, null);
return cs;
}
Minggu, 15 Mei 2011
download ADC2_fish.lite_Ver3.apk (2 MB) free
download apk ADC2_fish.lite_Ver3.apk for your android tablet
download link: mediafire
download link: mediafire
download ADC2_feuerware.apk (4 MB) free
download apk ADC2_feuerware.apk for your android tablet
download link: mediafire
download link: mediafire
download ADC2_fallsensor.apk free
download ADC2_fallsensor.apk free for your android tablet
download link: mediafire
download link: mediafire
download ADC2_droidspray.apk free
download ADC2_droidspray.apk (340 kB) for your tablet android
download link: mediafire
download link: mediafire
download ADC2_decades.apk free
download apk ADC2_decades.apk free for your android tablet
download link: mediafire
download link: mediafire
Scrollable Text View in andriod -2
This article helps to making Scrollable TextView using TextView with dispatchKeyEvent
we can make a scrollable textview while implement the setMovementMethod and dispatchKeyEvent.
1. private TextView mTextView;
2. Set the Required data in the TextView
mTextView = (TextView) findViewById(R.id.textView1);
mTextView.setText("this is for testing \nthis is for testing \nthis is for testing
\nthis is for testing \nthis is for testing \nthis is for testing \n");
3. mTextView.setMovementMethod(new ScrollingMovementMethod(){.....})
4. Override the methods in ScrollingMovementMethod
new ScrollingMovementMethod() {
public void onTakeFocus(TextView widget, Spannable text, int dir) {}
@Override
public boolean onKeyDown(TextView widget, Spannable buffer,
int keyCode, KeyEvent event) {
switch (keyCode) {
case KeyEvent.KEYCODE_DPAD_DOWN:
for (int i = 0, scrollAmount = getScrollAmount(widget); i < scrollAmount; i++) {
down(widget, buffer);
}
return true;
case KeyEvent.KEYCODE_DPAD_UP:
for (int i = 0, scrollAmount = getScrollAmount(widget); i < scrollAmount; i++) {
up(widget, buffer);
}
return true;
default:
return super.onKeyDown(widget, buffer, keyCode, event);
}
}
private int getScrollAmount(TextView widget) {
final int visibleLineCount = (int) ((1f * widget.getHeight()) / widget
.getLineHeight());
int scrollAmount = visibleLineCount - 1;
if (scrollAmount < 1) {
scrollAmount = 1;
}
return scrollAmount;
}
}
5. Call the dispatch method in your code
mTextView.dispatchKeyEvent(event);
SAMPLE
public class MainActivity extends Activity {
/** Called when the activity is first created. */
private TextView mTextView;
@Override
public void onCreate(Bundle savedInstanceState) {
super.onCreate(savedInstanceState);
setContentView(R.layout.main);
mTextView = (TextView) findViewById(R.id.textView1);
mTextView
.setText("this is for testing \nthis is for testing \nthis is for testing \nthis is for testing \nthis is for testing \nthis is for testing \n");
mTextView.setMovementMethod(new ScrollingMovementMethod() {
public void onTakeFocus(TextView widget, Spannable text, int dir) {
}
@Override
public boolean onKeyDown(TextView widget, Spannable buffer,
int keyCode, KeyEvent event) {
switch (keyCode) {
case KeyEvent.KEYCODE_DPAD_DOWN:
for (int i = 0, scrollAmount = getScrollAmount(widget); i < scrollAmount; i++) {
down(widget, buffer);
}
return true;
case KeyEvent.KEYCODE_DPAD_UP:
for (int i = 0, scrollAmount = getScrollAmount(widget); i < scrollAmount; i++) {
up(widget, buffer);
}
return true;
default:
return super.onKeyDown(widget, buffer, keyCode, event);
}
}
private int getScrollAmount(TextView widget) {
final int visibleLineCount = (int) ((1f * widget.getHeight()) / widget
.getLineHeight());
int scrollAmount = visibleLineCount - 1;
if (scrollAmount < 1) {
scrollAmount = 1;
}
return scrollAmount;
}
});
}
@Override
public boolean onKeyDown(int keyCode, KeyEvent event) {
switch (keyCode) {
case KeyEvent.KEYCODE_DPAD_DOWN:
return true;
case KeyEvent.KEYCODE_DPAD_UP:
mTextView.dispatchKeyEvent(event);
return true;
default:
return super.onKeyDown(keyCode, event);
}
}
}
Scrollable Text View in andriod
This article helps to making Scrollable TextView in Android.
We can do it two ways. 1.Create a TextView inside the ScrollView and 2. TextView with dispatch Events.
Create a TextView inside the ScrollView
< ScrollView android:layout_width="fill_parent" android:layout_height="wrap_content"
android:fillViewport="true">
< LinearLayout android:layout_width="fill_parent" android:layout_height="fill_parent">
< TextView android:text="@+id/TextView01"
android:id="@+id/mTextView"
android:layout_width="fill_parent"
android:layout_height="fill_parent">< / TextView>
< / LinearLayout>
< / ScrollView>
Activity Implementation
mTextView = (TextView) findViewById(R.id.logTextView);
mTextView .setText("");
mTextView .setMovementMethod(ScrollingMovementMethod.getInstance());
download ADC2_cubeworks.apk free
download apk ADC2_cubeworks.apk (669 kB) for your android tablet free
download link: mediafire
download link: mediafire
download ADC2_celeste.adcii.apk free
download apk ADC2_celeste.adcii.apk for your android tablet
download link: mediafire
download link: mediafire
download ADC2_cartoonGang.apk free
download apk ADC2_cartoonGang.apk for your android tablet free
download link: mediafire
download link: mediafire
download ADC2_botanica.apk free
download apk ADC2_botanica.apk for your android tablet free
download link: mediafire
download link: mediafire
download ADC2_arnav.apk free mediafire
download apk ADC2_arnav.apk free for your android tablet
download link: mediafire
download link: mediafire
download ADC2_aps.apk free mediafire
download apk ADC2_aps.apk for your android tablet free
download link: mediafire
download link: mediafire
download ADC2_aPortaDrum_ver153.apk free
download apk ADC2_aPortaDrum_ver153.apk for your android tablet free
download link: mediafire
download link: mediafire
download ADC2_.tv..apk free mediafire
download apk ADC2_.tv..apk for your tablet android from mediafire
download link: mediafire
download link: mediafire
download ADC2_.totemo_0.apk mediafire
download apk ADC2_.totemo_0.apk free for your android tablet
download link: mediafire
download link: mediafire
download ADC2_.adam.apk free mediafire
download apk ADC2_.adam.apk for your android tablet free from mediafire
download link: mediafire
download link: mediafire
download aContacts.apk free mediafire
download apk aContacts.apk for your android tablet free from mediafire
download link: mediafire
download link: mediafire
download accudial.apk free mediafire
download apk accudial.apk for your android tablet free from mediafire
link download: mediafire
link download: mediafire
download abtc_ver1.3.apk free mediafire
download apk abtc_ver1.3.apk for your android tablet
link download: mediafire
link download: mediafire
Sabtu, 14 Mei 2011
download a2b-GPS2.2.0.apk from ziddu
after download the file from ziddu plase rename the file from "a2b-GPS2.2.0.zip" to "a2b-GPS2.2.0.apk" non neet to extract.
download apk link :
ziddu
download apk link :
ziddu
download 1 Vs 100 V.2.3.4.apk free
download 1 Vs 100 V.2.3.4.apk for your android tablet
download link : mediafire
download link : mediafire
Kamis, 12 Mei 2011
How to Obfuscated Android Code
Obfuscated code is source or machine code that has been made difficult to understand for humans. Programmers may deliberately obfuscate code to conceal its purpose or its logic to prevent tampering, deter reverse engineering, or as a puzzle or recreational challenge for someone reading the source code.
Programs known as obfuscators transform readable code into obfuscated code using various techniques. Code obfuscation is different in essence from hardware obfuscation, where description and/or structure of a circuit is modified to hide its functionality.
The following steps to describe the android obfuscation
1) Setup the obfuscated environment Download the follwing file before you starts
ProGuard
ProGuard is a free Java class file shrinker, optimizer, obfuscator, and preverifier. It detects and removes unused classes, fields, methods, and attributes. It optimizes bytecode and removes unused instructions. It renames the remaining classes, fields, and methods using short meaningless names. Finally, it preverifies the processed code for Java 6 or for Java Micro Edition.
Download From Sourceforge : http://sourceforge.net/
Reference : http://proguard.sourceforge.
Download files from internet
- add-proguard-release.xml
- procfg.txt
1) To update an existing Android project, open a command-line and navigate to the tools/ directory of your SDK. Now run:
android update project --name
2) So, now you have a signed build from the command line, but still no obfuscated build.
To make things easy, you’re going to want to get two helper files:
add-proguard-release.xml and procfg.txt
Copy these files into your root directory (where the build.xml file found).
3) To add Proguard to your build, you first need to edit your local properties file to add the location of the directory that Proguard is installed in:
proguard.dir=/Directory/
3) Finally... you need to add our script to your build file and have it override a few targets. To do this, we use the XML “entity” construct. At the top of your build.xml file, add an entity that references our script file:
]
>
4) By default ADT creates a proguard.cfg file with every new project, so if you have an existing project just copy it over from a new dummy project. The next step is to enable ProGuard, you do this by adding the following to your default.properties file:
proguard.config=proguard.cfg
(assuming proguard.cfg is the ProGuard configuration file created for you, or copied from a new project, into the project root folder.)
Rabu, 11 Mei 2011
How to convert .Class file into .java (Decompiler)
This post discusses about how to convert a .class file into .java. In general we are unable to convert a .class file into .java programatically but it is not impossible we can do it by using a tool. If you are using eclipse then open Help in eclipse menu option then Install new softwares it will open a dialog box enter the following url into text area http://java.decompiler.free.fr/jd-eclipse/update
then press next and finish. Eclipse asks u for restart the eclipse. After restart of the eclipse if u open any class file it will show you the source file of the .class.
then press next and finish. Eclipse asks u for restart the eclipse. After restart of the eclipse if u open any class file it will show you the source file of the .class.
Minggu, 08 Mei 2011
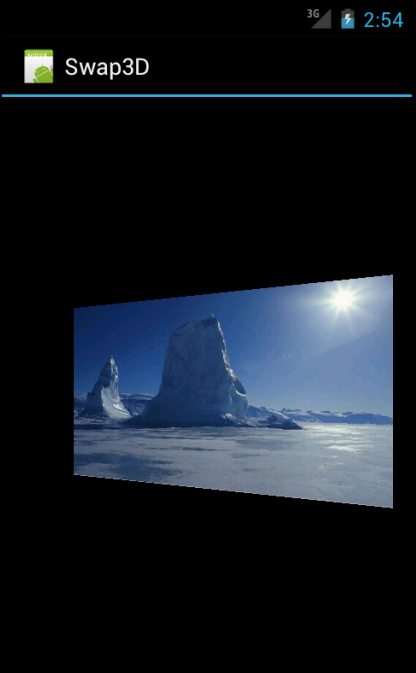
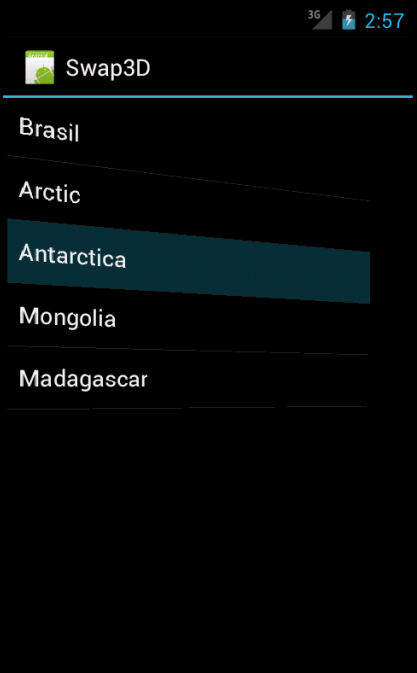
View - 3D Transition Between ListView And ImageView
This example shows how to use layout animation and various transformations on views. The result is a 3D transition between a ListView and an ImageView.
When the user clicks the list, it flips to show the picture. When the user clicks the picture, it flips to show the list.
The animation is made of two smaller animations:
- rotates the list by 90 degrees on the Y axis and the second half rotates the picture by 90 degrees on the Y axis.
- After that, the list is made invisible and the picture is set visible.
This animation also adds a translation on the Z axis (depth) to improve the effect.
Here are our Java codes, Swap3D.java:
package com.bogotobogo.android.swap3d;
import android.app.Activity;
import android.os.Bundle;
import android.widget.ListView;
import android.widget.ArrayAdapter;
import android.widget.AdapterView;
import android.widget.ImageView;
import android.view.View;
import android.view.ViewGroup;
import android.view.animation.Animation;
import android.view.animation.AccelerateInterpolator;
import android.view.animation.DecelerateInterpolator;
public class Swap3D extends Activity implements
AdapterView.OnItemClickListener, View.OnClickListener {
private ListView mPhotosList;
private ViewGroup mContainer;
private ImageView mImageView;
// Names of the photos we show in the list
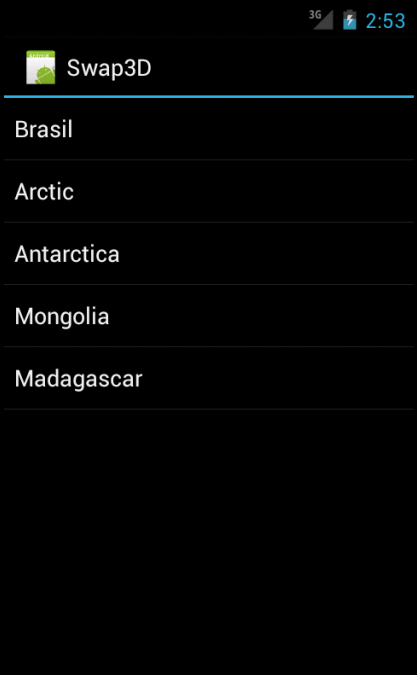
private static final String[] PHOTOS_NAMES = new String[] {
"Brasil",
"Arctic",
"Antarctica",
"Mongolia",
"Madagascar"
};
// Resource identifiers for the photos we want to display
private static final int[] PHOTOS_RESOURCES = new int[] {
R.drawable.p1,
R.drawable.p2,
R.drawable.p3,
R.drawable.p4,
R.drawable.p5
};
@Override
protected void onCreate(Bundle savedInstanceState) {
super.onCreate(savedInstanceState);
setContentView(R.layout.main);
mPhotosList = (ListView) findViewById(android.R.id.list);
mImageView = (ImageView) findViewById(R.id.picture);
mContainer = (ViewGroup) findViewById(R.id.container);
// Prepare the ListView
final ArrayAdapter adapter = new ArrayAdapter(this,
android.R.layout.simple_list_item_1, PHOTOS_NAMES);
mPhotosList.setAdapter(adapter);
mPhotosList.setOnItemClickListener(this);
// Prepare the ImageView
mImageView.setClickable(true);
mImageView.setFocusable(true);
mImageView.setOnClickListener(this);
// Since we are caching large views, we want to keep their cache
// between each animation
mContainer.setPersistentDrawingCache(ViewGroup.PERSISTENT_ANIMATION_CACHE);
}
/**
* Setup a new 3D rotation on the container view.
*
* @param position the item that was clicked to show a picture, or -1 to show the list
* @param start the start angle at which the rotation must begin
* @param end the end angle of the rotation
*/
private void applyRotation(int position, float start, float end) {
// Find the center of the container
final float centerX = mContainer.getWidth() / 2.0f;
final float centerY = mContainer.getHeight() / 2.0f;
// Create a new 3D rotation with the supplied parameter
// The animation listener is used to trigger the next animation
final Rotate rotation =
new Rotate(start, end, centerX, centerY, 310.0f, true);
rotation.setDuration(500);
rotation.setFillAfter(true);
rotation.setInterpolator(new AccelerateInterpolator());
rotation.setAnimationListener(new DisplayNextView(position));
mContainer.startAnimation(rotation);
}
public void onItemClick(AdapterView parent, View v, int position, long id) {
// Pre-load the image then start the animation
mImageView.setImageResource(PHOTOS_RESOURCES[position]);
applyRotation(position, 0, 90);
}
public void onClick(View v) {
applyRotation(-1, 180, 90);
}
/**
* This class listens for the end of the first half of the animation.
* It then posts a new action that effectively swaps the views when the container
* is rotated 90 degrees and thus invisible.
*/
private final class DisplayNextView implements Animation.AnimationListener {
private final int mPosition;
private DisplayNextView(int position) {
mPosition = position;
}
public void onAnimationStart(Animation animation) {
}
public void onAnimationEnd(Animation animation) {
mContainer.post(new SwapViews(mPosition));
}
public void onAnimationRepeat(Animation animation) {
}
}
/**
* This class is responsible for swapping the views and start the second
* half of the animation.
*/
private final class SwapViews implements Runnable {
private final int mPosition;
public SwapViews(int position) {
mPosition = position;
}
public void run() {
final float centerX = mContainer.getWidth() / 2.0f;
final float centerY = mContainer.getHeight() / 2.0f;
Rotate rotation;
if (mPosition > -1) {
mPhotosList.setVisibility(View.GONE);
mImageView.setVisibility(View.VISIBLE);
mImageView.requestFocus();
rotation = new Rotate(90, 180, centerX, centerY, 310.0f, false);
} else {
mImageView.setVisibility(View.GONE);
mPhotosList.setVisibility(View.VISIBLE);
mPhotosList.requestFocus();
rotation = new Rotate(90, 0, centerX, centerY, 310.0f, false);
}
rotation.setDuration(5000);
rotation.setFillAfter(true);
rotation.setInterpolator(new DecelerateInterpolator());
mContainer.startAnimation(rotation);
}
}
}
and Rotation.java:
package com.bogotobogo.android.swap3d;

import android.view.animation.Animation;
import android.view.animation.Transformation;
import android.graphics.Camera;
import android.graphics.Matrix;

public class Rotate extends Animation {
    private final float mFromDegrees;
    private final float mToDegrees;
    private final float mCenterX;
    private final float mCenterY;
    private final float mDepthZ;
    private final boolean mReverse;
    private Camera mCamera;

    /**
     * Creates a new 3D rotation on the Y axis. The rotation is defined by its
     * start angle and its end angle. Both angles are in degrees. The rotation
     * is performed around a center point on the 2D space, definied by a pair
     * of X and Y coordinates, called centerX and centerY. When the animation
     * starts, a translation on the Z axis (depth) is performed. The length
     * of the translation can be specified, as well as whether the translation
     * should be reversed in time.
     *
     * @param fromDegrees the start angle of the 3D rotation
     * @param toDegrees the end angle of the 3D rotation
     * @param centerX the X center of the 3D rotation
     * @param centerY the Y center of the 3D rotation
     * @param reverse true if the translation should be reversed, false otherwise
     */
    public Rotate(float fromDegrees, float toDegrees,
            float centerX, float centerY, float depthZ, boolean reverse) {
        mFromDegrees = fromDegrees;
        mToDegrees = toDegrees;
        mCenterX = centerX;
        mCenterY = centerY;
        mDepthZ = depthZ;
        mReverse = reverse;
    }

    @Override
    public void initialize(int width, int height, int parentWidth, int parentHeight) {
        super.initialize(width, height, parentWidth, parentHeight);
        mCamera = new Camera();
    }

    @Override
    protected void applyTransformation(float interpolatedTime, Transformation t) {
        final float fromDegrees = mFromDegrees;
        float degrees = fromDegrees + ((mToDegrees - fromDegrees) * interpolatedTime);

        final float centerX = mCenterX;
        final float centerY = mCenterY;
        final Camera camera = mCamera;

        final Matrix matrix = t.getMatrix();

        camera.save();
        if (mReverse) {
            camera.translate(0.0f, 0.0f, mDepthZ * interpolatedTime);
        } else {
            camera.translate(0.0f, 0.0f, mDepthZ * (1.0f - interpolatedTime));
        }
        camera.rotateY(degrees);
        camera.getMatrix(matrix);
        camera.restore();

        matrix.preTranslate(-centerX, -centerY);
        matrix.postTranslate(centerX, centerY);
    }
}
Layout file is /res/layout/:
<?xml version="1.0" encoding="utf-8"?>
<FrameLayout xmlns:android="http://schemas.android.com/apk/res/android"
    android:id="@+id/container"
    android:layout_width="fill_parent"
    android:layout_height="fill_parent">
    <ListView
        android:id="@android:id/list"
        android:persistentDrawingCache="animation|scrolling"
        android:layout_width="fill_parent"
        android:layout_height="fill_parent"
        android:layoutAnimation="@anim/layout_bottom_to_top_slide" />

    <ImageView
        android:id="@+id/picture"
        android:scaleType="fitCenter"
        android:layout_width="fill_parent"
        android:layout_height="fill_parent"
        android:visibility="gone" />
</FrameLayout>
And the two XML files for animation, /res/anim/layout_bottom_to_top_slide.xml:
<?xml version="1.0" encoding="utf-8"?>and /res/anim/slide_right.xml:
<layoutAnimation xmlns:android="http://schemas.android.com/apk/res/android"
android:delay="30%"
android:animationOrder="reverse"
android:animation="@anim/slide_right" />
<?xml version="1.0" encoding="utf-8"?>
<set xmlns:android="http://schemas.android.com/apk/res/android"
  android:interpolator="@android:anim/accelerate_interpolator">
    <translate android:fromXDelta="-100%p" android:toXDelta="0"
            android:duration="@android:integer/config_shortAnimTime" />
</set>
Files used in this View Animation example, Swap3D.zip
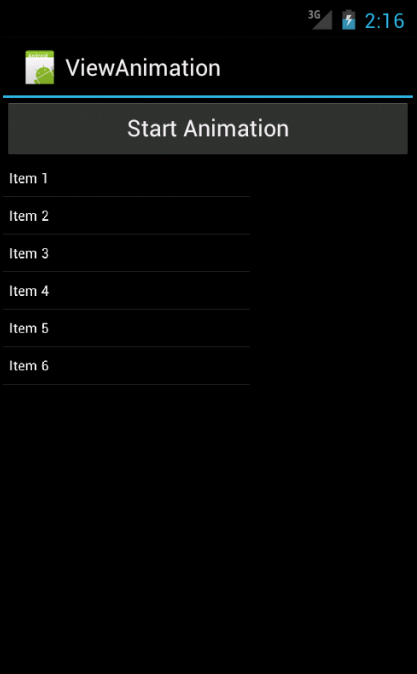
View Animation In Android Using ListView
Android exposes the transformation matrix for a view by allowing us to register an animation object with the view. The animation object will have a callback that lets it obtain the current matrix for a view and change it in some manner to arrive at a new view.
Let's start by planning an example for animating a view. We'll begin with an activity where we'll place a ListView with a few items. Then, we will create a button at the top of the screen to start the ListView animation when clicked.
Let's look at the layout file, /res/list_layout.xml
<?xml version="1.0" encoding="utf-8"?>The layout has two parts: the first is the button named btn_animate to animate a view, and the second part is the ListView, which is named list_view_id.
<LinearLayout xmlns:android=
"http://schemas.android.com/apk/res/android"
android:orientation="vertical"
android:layout_width="fill_parent"
android:layout_height="fill_parent">
<Button
android:id="@+id/btn_animate"
android:layout_width="fill_parent"
android:layout_height="wrap_content"
android:text="Start Animation"/>
<ListView
android:id="@+id/list_view_id"
android:persistentDrawingCache=
"animation|scrolling"
android:layout_width="fill_parent"
android:layout_height="fill_parent"/>
</LinearLayout>
Now we have the layout for the activity, we can create the activity to show the view:
ViewAnimation.java
package com.bogotobogo.viewanimation;We have loaded the view and set up the ListView to contain six text items. We've set up the button in such a way that it would call animate() when clicked.
import android.app.Activity;
import android.os.Bundle;
import android.view.View;
import android.widget.ArrayAdapter;
import android.widget.Button;
import android.widget.ListView;
public class ViewAnimation extends Activity
{
@Override
public void onCreate(Bundle savedInstanceState){
super.onCreate(savedInstanceState);
setContentView(R.layout.list_layout);
setupListView();
this.setupButton();
}
private void setupListView(){
String[] listItems = new String[] {
"Item 1", "Item 2", "Item 3",
"Item 4", "Item 5", "Item 6",
};
ArrayAdapter listItemAdapter =
new ArrayAdapter(this
,android.R.layout.simple_list_item_1
,listItems);
ListView lv = (ListView)this.findViewById(R.id.list_view_id);
lv.setAdapter(listItemAdapter);
}
private void setupButton(){
Button b = (Button)this.findViewById(R.id.btn_animate);
b.setOnClickListener(
new Button.OnClickListener(){
public void onClick(View v) {
animateListView();
}
});
}
private void animateListView() {
ListView lv = (ListView)this.findViewById(R.id.list_view_id);
  ViewAnim animation = new ViewAnim();
lv.startAnimation(animation);
}
}
We can invoke this activity as long as we register it in the AndroidManifest.xml file:
<activity android:name=".ViewAnimation"We want to add animation to the ListView. So, we need a class that derives from android.view.animation.Animation. We then need to override the applyTransformation method to modify the transformation matrix.
android:label="@string/app_name">
Let's call this derived class ViewAnim
ViewAnim.java
package com.bogotobogo.viewanimation;Once we have the ViewAnim class, we can do:
import android.graphics.Matrix;
import android.view.animation.Animation;
import android.view.animation.LinearInterpolator;
import android.view.animation.Transformation;
public class ViewAnim extends Animation
{
public void ViewAnimation2(){}
@Override
public void initialize(int width, int height, int parentWidth,
int parentHeight) {
super.initialize(width, height, parentWidth, parentHeight);
setDuration(2500);
setFillAfter(true);
setInterpolator(new LinearInterpolator());
}
@Override
protected void applyTransformation(float interpolatedTime, Transformation t){
final Matrix matrix = t.getMatrix();
matrix.setScale(interpolatedTime, interpolatedTime);
}
}
ListView lv = (ListView)this.findViewById(R.id.list_view_id);as in the animateListView() method.
ViewAnim animation = new ViewAnim();
Let's look at the class more carefully.
The initialize() method ia s callback method that tells us about the dimensions of the view. This is also a place to initialize any animation parameters we might have.
The main part of the animation occurs in the applyTransformation() method. The Android framework will call this method again and again to do animation. Every time Android calls the method, interpolatedTime has a different value. This parameter changes from 0 to 1 depending on where we are in the 2.5 second duration that we set during initialization.
We want to change the transformation matrix that is available through the transformation object called t in the applyTransformation() method. We will first get the matrix and change something about it. When the view gets painted, the new matrix will take effect.
The setScale() method takes two parameters: the scaling factor in the x direction and the scaling factor in the y direction.
matrix.setScale(interpolatedTime, interpolatedTime);Because the interpolatedTime goes between 0 and 1, we can use that value directly as the scaling factor. So when we start the animation, the scaling factor is 0 in both x and y directions.
Here are some snapshots during the animation.

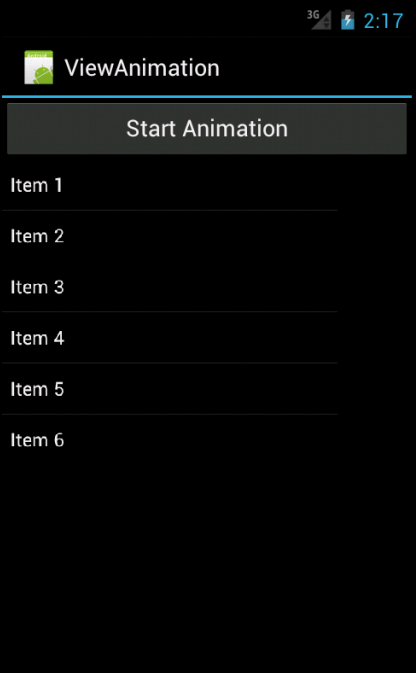
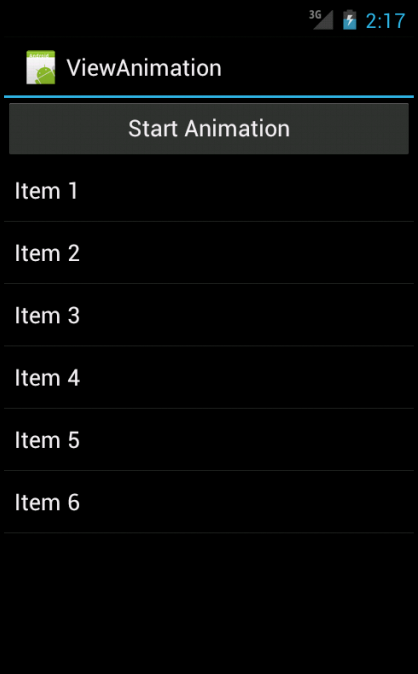
Files used in this View Animation example, ViewAnimation.zip
Layout Animation In Android
Layout Animation
We'll use layout animation with the ListView and GridView, which are the two most commonly-used controls in Android. Specifically, we'll use layout animation to add visual effects to the way each item in a ListView or GridView is displayed. Actually, we can use this type of animation on all controls derived from a ViewGroup.
Layout animation works by applying tweening to each view that is part of the layout being animated. Here are four types of tweening animation:
We can define both the individual animation and the mediator in XML files in the /res/anim subdirectory. Once we have the mediator XML file, we can use that file as an input to the ListView in its own XML layout definition.
Let's start by creating XML layout for the ListView so we can load that layout in a basic activity.
Here is the file, /res/layout/list_layout.xml:
Now that we have the layout needed for the activity, we can write the code for the activity to load the layout file so we can generate our UI.
LayoutAnimation.java
/res/anim/list_layout_controller.xml
Here are the XML files for the animation set:
/res/anim/alpha.xml
/res/anim/rotation.xml
/res/anim/scale.xml
/res/anim/translate_alpha.xml
Files used in this layout animation example, LayoutAnimation.zip
We'll use layout animation with the ListView and GridView, which are the two most commonly-used controls in Android. Specifically, we'll use layout animation to add visual effects to the way each item in a ListView or GridView is displayed. Actually, we can use this type of animation on all controls derived from a ViewGroup.
Layout animation works by applying tweening to each view that is part of the layout being animated. Here are four types of tweening animation:
- Scale animation
We use this type of animation to make a view smaller or larger either on x axis or on the y axis. We can also specify the pivot point around which we want the animation to take place. - Rotate animation
We use this to rotate a view around a pivot point by a certain number of degrees. - Translate animation
We use this to move a view along the x or y axis. - Alpha animation
We use this to change the transparency of a view.
We can define both the individual animation and the mediator in XML files in the /res/anim subdirectory. Once we have the mediator XML file, we can use that file as an input to the ListView in its own XML layout definition.
Let's start by creating XML layout for the ListView so we can load that layout in a basic activity.
Here is the file, /res/layout/list_layout.xml:
<?xml version="1.0" encoding="utf-8"?>The file shows a simple LinearLayout with a single ListView in it. However, we should mention one point about the ListView definition.
<LinearLayout xmlns:android="http://schemas.android.com/apk/res/android"
android:orientation="vertical"
android:layout_width="fill_parent"
android:layout_height="fill_parent">
<ListView
android:id="@+id/list_view_id"
android:persistentDrawingCache="animation|scrolling"
android:layout_width="fill_parent"
android:layout_height="fill_parent"
android:layoutAnimation="@anim/list_layout_controller" />
</LinearLayout>
Now that we have the layout needed for the activity, we can write the code for the activity to load the layout file so we can generate our UI.
LayoutAnimation.java
package com.bogotobogo.layoutanimation;First, we loads the view based on the generated layout ID R.layout.list_layout
import android.app.Activity;
import android.os.Bundle;
import android.widget.ArrayAdapter;
import android.widget.ListView;
public class LayoutAnimation extends Activity
{
@Override
public void onCreate(Bundle savedInstanceState){
super.onCreate(savedInstanceState);
setContentView(R.layout.list_layout);
setupListView();
}
private void setupListView(){
String[] listItems = new String[] {
  "Item 1", "Item 2", "Item 3",
  "Item 4", "Item 5", "Item 6",
 };
ArrayAdapter listItemAdapter =
new ArrayAdapter(this
,android.R.layout.simple_list_item_1
,listItems);
ListView lv = (ListView)this.findViewById(R.id.list_view_id);
lv.setAdapter(listItemAdapter);
}
}
ListView lv = (ListView)this.findViewById(R.id.list_view_id);Our goal is to take the ListView from this layout and populate it with six text items. These items are loaded up into an array.
String[] listItems = new String[] {
"Item 1", "Item 2", "Item 3",
"Item 4", "Item 5", "Item 6",
};We'll need to set a data adapter into a ListView so that the ListView can show those items.lv.setAdapter(listItemAdapter);To create the necessary adapter, we'll need to specify how each item will be laid out when the list is displayed. We specify the layout by using a predefined layout in the base Android framework. This layout is specified as
android.R.layout.simple_list_item_1However, as with any other activity invocation, we'll need to register the LayoutAnimationActivity in the AndroidManifest.xml file for the preceding intent invocation to work:
<?xml version="1.0" encoding="utf-8"?>We need another XML file that acts as a mediator between itself and the animation set. Here is the mediator XML file:
<manifest xmlns:android="http://schemas.android.com/apk/res/android"
package="com.bogotobogo.layoutanimation"
android:versionCode="1"
android:versionName="1.0">
<application android:icon="@drawable/icon" android:label="@string/app_name">
<activity android:name=".LayoutAnimation"
android:label="@string/app_name">
<intent-filter>
<action android:name="android.intent.action.MAIN" />
<category android:name="android.intent.category.LAUNCHER" />
</intent-filter>
</activity>
</application>
<uses-sdk android:minSdkVersion="4" />
</manifest>
/res/anim/list_layout_controller.xml
<layoutAnimation xmlns:android="http://schemas.android.com/apk/res/android"The mediator file, in this case, is for the transparency animation as we can see it from the line:
android:delay="30%"
android:animationOrder="reverse"
android:animation="@anim/alpha" />
android:animation="@anim/alpha" />
Here are the XML files for the animation set:
/res/anim/alpha.xml
<alpha xmlns:android="http://schemas.android.com/apk/res/android"
    android:interpolator="@android:anim/accelerate_interpolator"
    android:fromAlpha="0.0" android:toAlpha="1.0"  android:duration="5000" />
/res/anim/rotation.xml
<rotate xmlns:android="http://schemas.android.com/apk/res/android"
    android:interpolator="@android:anim/accelerate_interpolator"
    android:fromDegrees="0.0"
    android:toDegrees="360"
    android:pivotX="50%"
    android:pivotY="50%"
    android:duration="500" />
/res/anim/scale.xml
<set xmlns:android="http://schemas.android.com/apk/res/android"
      android:interpolator="@android:anim/accelerate_interpolator">
   <scale
      android:fromXScale="1"
      android:toXScale="1"
      android:fromYScale="0.1"
      android:toYScale="1.0"
      android:duration="500"
      android:pivotX="50%"
      android:pivotY="50%"
      android:startOffset="100" />
</set>
/res/anim/translate_alpha.xml
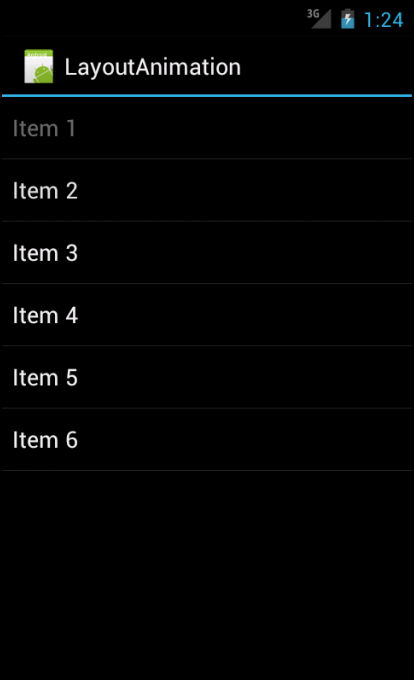
<set xmlns:android="http://schemas.android.com/apk/res/android"Here is a snapshot during the transparency animation.
android:interpolator="@android:anim/accelerate_interpolator">
<translate android:fromYDelta="-100%" android:toYDelta="0"
android:duration="500" />
<alpha android:fromAlpha="0.0" android:toAlpha="1.0"
android:duration="500" />
</set>
Files used in this layout animation example, LayoutAnimation.zip
Sabtu, 07 Mei 2011
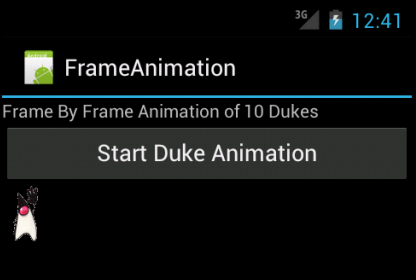
Android Tutorial . Animation - Frame By Frame, Layout
Android supports three types of animation:
- Frame-by-frame animation
A series of frames is drawn one after the other at regular intervals. - Layout animation
Animate views inside a container view such as lists and tables. - View animation
Animate any general-purpose view.
Frame By Frame Animation
I used the following Duke files to make the each frame of animation.
d1.gif:d2.gif:
d3.gif:
d4.gif:
d5.gif:

d6.gif:d7.gif:
d8.gif:
d9.gif:
d10.gif:

Let's look at the basic XML layout file,/res/layout/frame_animation_layout.xml.
Full List of Tutorial
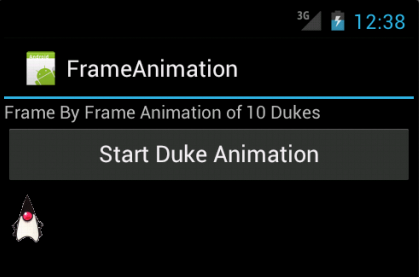
<?xml version="1.0" encoding="utf-8"?>The first control is the text control which is a simple TextView. Then the next control is a button to start and stop the animation. The last view is the ImageView, where we will do the animation. So, now we have the layout.
<LinearLayout xmlns:android=
"http://schemas.android.com/apk/res/android"
android:orientation="vertical"
android:layout_width="fill_parent"
android:layout_height="fill_parent">
<TextView android:id="@+id/textViewId1"
android:layout_width="fill_parent"
android:layout_height="wrap_content"
android:text=
"Frame By Frame Animation of 10 Dukes"/>
<Button
android:id="@+id/startFAButtonId"
android:layout_width="fill_parent"
android:layout_height="wrap_content"
android:text="Start Duke Animation"
/>
<ImageView
android:id="@+id/animationImage"
android:layout_width="wrap_content"
android:layout_height="wrap_content"/>
</LinearLayout>
In Android, we accomplish frame-by-frame animation through a class in the graphics package called AnimationDrawable. We can tell from its name that it is like any other drawable that can work as background for any view. For example the background bitmaps are represented as Drawables. The class AnimationDrawable, in addition to being a Drawable, can take a list of other Drawable resources like images and render them at specified intervals. This class is really a thin wrapper around the animation support provided by the basic Drawable class.
To make use of the AnimationDrawable class, let's start with a set of Drawable resources in the /res/drawable subdirectory. Keep in mind that we need to put all the images into the same drawable directory as well as the xml file below.
/res/drawable/frame_animation.xml.
<animation-list xmlns:android=
 "http://schemas.android.com/apk/res/android"
android:oneshot="false">
   <item android:drawable="@drawable/d1" android:duration="50" />
   <item android:drawable="@drawable/d2" android:duration="50" />
   <item android:drawable="@drawable/d3" android:duration="50" />
   <item android:drawable="@drawable/d4" android:duration="50" />
   <item android:drawable="@drawable/d5" android:duration="50" />
   <item android:drawable="@drawable/d6" android:duration="50" />
   <item android:drawable="@drawable/d7" android:duration="50" />
   <item android:drawable="@drawable/d8" android:duration="50" />
   <item android:drawable="@drawable/d9" android:duration="50" />
   <item android:drawable="@drawable/d10" android:duration="50" />
</animation-list>
Let's look at our java code, :
package com.bogotobogo.frameanimation;Each frame points to one of the duke images we have assembled through their resource IDs. The animation-list tag gets converted into an AnimationDrawable object representing the collection of images. We will then need to set the Drawable as a background resource for out ImageView.
import android.app.Activity;
import android.graphics.drawable.AnimationDrawable;
import android.os.Bundle;
import android.view.View;
import android.widget.Button;
import android.widget.ImageView;
public class FrameAnimation extends Activity {
@Override
public void onCreate(Bundle savedInstanceState) {
super.onCreate(savedInstanceState);
setContentView(R.layout.frame_animations_layout);
this.setupButton();
}
private void setupButton() {
Button b = (Button)this.findViewById(R.id.startFAButtonId);
b.setOnClickListener(
new Button.OnClickListener() {
public void onClick(View v) {
parentButtonClicked(v);
}
});
}
private void parentButtonClicked(View v) {
animate();
}
private void animate() {
ImageView imgView = (ImageView)findViewById(R.id.animationImage);
imgView.setVisibility(ImageView.VISIBLE);
imgView.setBackgroundResource(R.drawable.frame_animation);
AnimationDrawable frameAnimation =
       (AnimationDrawable) imgView.getBackground();
if (frameAnimation.isRunning()) {
frameAnimation.stop();
}
else {
frameAnimation.stop();
frameAnimation.start();
}
}
}
ImageView imgView = (ImageView)findViewById(R.id.animationImage);With this code, Android knows that the resource ID R.drawable.frame_animation is an XML resource and accordingly constructs a AnimationDrawable Java object for it before setting it as the background. Once this is set, we can access this AnimationDrawable object by doing a "get" on the view object:
imgView.setBackgroundResource(R.drawable.frame_animation);
AnimationDrawable frameAnimation =Once we have the AnimationDrawable, we can use start() and stop() methods of this object to start and stop the animation.
(AnimationDrawable) imgView.getBackground();
Files used in this Frame-By-Frame animation example, FrameAnimation.zip
Langganan:
Komentar (Atom)