
Kamis, 31 Maret 2011
Selasa, 15 Maret 2011
Hello Vibrate , an Android App
My project is named Zoom Demo, with a Build Target of Android 1.5. The Application name is also Zoom Demo, and has a package name of “com.zoomcreates.android.demo”. The activity is the name of your main class, and appropriately I named it “demo”. To set these up, choose File > New > Project…, and choose Android Project from the Android section in the Wizards box.
This will set up your source tree automagically, and include in a couple of files and directories needed to compile. The main Java code is located in the src folder, under the package name. It should be named the same as your main Activity, so in my case it is called demo.java. Here is the finished code for this app:
Let’s break that down some…
Here we define our package name, and import all the android goodies that we need. The package line should have been created for you, and you shouldn’t have to touch it. A few imports have been set up for you too, but Eclipse is pretty nice and lets you know if your are trying to do something that requires an include. I added these in when Eclipse told me too, and these are all the includes needed for my app.
Here is where our main Activity is declared. Since I have the main Activity returning button clicks to itself, I had it implement View.OnClickListener, so it can respond to button clicks. Next are three variable declarations, atomBtn, textWidget and v.
Each Activity has an onCreate event, and we are overriding the default to give it some functionality. You can ignore that Bundle icicle for now, just pass it to the super.onCreate method and we can move right on.
Next I tell v to be a Vibrator System Service, so we can make the phone shake. setContentView is being passed R.layout.main which is an XML file that describes the layout of the app. atomBtn is an ImageButton, which gets its info from that same XML file and then we set its onClickListener to the app. textWidget is also found in that XML file, and the last thing that we do is call the public method updateText(). Next we have…
… two more overrides for normal android apps. Here I am building a menu. This is only one way to do this, as you can define your menu in a layout XML file, but I wanted to show both ways of building UI elements in this tutorial. So I pass menu (which is a Menu) to the onCreateOptionsMenu method. This is what Android considers to be an Application Menu, and you can see this when you tap the menu button on the phone. I then declare item as a MenuItem, and add “Clear Zooms” as the title of this item. Next line addes the icon edit.png to this menu item (R.drawable.edit). That icon is found in the drawable folder, and make sure that you don’t put the file extention when declaring the icon. Then I add another menu item titled “Quit App” and give it that icon.
The next method actually tells the app what do to when those menu items are clicked. I check against the item title, because it was easy to see what I set those as. When you click on “Clear Zooms”, the textWidget gets set back to an empty string. When you click “Quit App”, it calls finish(), which quits the program gracefully.
Because these methods are boolean methods, I return true to finish them both off.
The last two methods are the onClick, which only calls the method updateText, and this is being called by the ImageButton. updateText both appends “Zoom… ” to our textWidget, and tells the phone to vibrate for 300 milliseconds. Then we close out the main Activity, demo, with that last curly brace.
So, that is all that we need as far as Java code goes. I mentioned an XML layout file. Every Android app uses XML layouts to figure out display items, and lay them out correctly. You can use different GUI builders to generate the XML you need, but it’s pretty easy to do by hand too. I didn’t really do that great of a job with this program’s layout, as I was more focusing on the java. I knew that my phone had an 480×800 screen, so I made a background image that was that size, and I knew that my button was 250 pixels wide, so 75 pixels of padding would put it near the center of the screen.
So, the layout XML file is located in the “res” folder of your project source tree, inside another folder called “layout”. It is named main.xml, and here is what mine looks like:
I used an Absolute layout so that different items could overlay each other. I have 3 elements in this xml file, the first being an ImageView that is the background image. It is delcared first, so it’s drawn on the bottom. The next element is an ImageButton with the id of atomBtn, which you hopefully remember from the Java code above. These usually come with a gray background that makes it look like a button, but I got rid of that by making a small transparent PNG and setting that to the android:background attribute. Last we have the TextView with the id textWidget, and I set the color to #333333.
Each of my PNG images for this app go inside the /res/drawable folder, and the included one called icon.png is the application icon you see on the phone. I overwrote the default to give it some extra polish.
There were only two things left that I needed to do. First, to get access to the vibration of a phone, you need to set the PERMISSIONS for that in the AndroidManifest. Also, I wanted this ap to run full screen, without the status bar or title bar, so I added a theme to the application that is set up to do just that. Here’s my AndroidManifest.xml. Note the <uses-permission> element and the android:theme attribute of the <activity> element.

final Out Put :
Android Button Highlight
n this section, you will create a button with a custom image instead of text, using the
Button widget and an XML file that defines three different images to use for the different button states. When the button is pressed, a short message will be displayed.


- Copy the images on the right into the
res/drawable/directory of your project. These will be used for the different button states. - Create a new file in the
res/drawable/directory namedandroid_button.xml. Insert the following XML:<?xml version="1.0" encoding="utf-8"?>
<selector xmlns:android="http://schemas.android.com/apk/res/android">
<item android:drawable="@drawable/android_pressed"
android:state_pressed="true" />
<item android:drawable="@drawable/android_focused"
android:state_focused="true" />
<item android:drawable="@drawable/android_normal" />
</selector>This defines a single drawable resource, which will change its image based on the current state of the button. The first<item>definesandroid_pressed.pngas the image when the button is pressed (it's been activated); the second<item>definesandroid_focused.pngas the image when the button is focused (when the button is highlighted using the trackball or directional pad); and the third<item>definesandroid_normal.pngas the image for the normal state (when neither pressed nor focused). This XML file now represents a single drawable resource and when referenced by aButtonfor its background, the image displayed will change based on these three states.Note: The order of the<item>elements is important. When this drawable is referenced, the<item>s are traversed in-order to determine which one is appropriate for the current button state. Because the "normal" image is last, it is only applied when the conditionsandroid:state_pressedandandroid:state_focusedhave both evaluated false. - Open the
res/layout/main.xmlfile and add theButtonelement:<Button
android:id="@+id/button"
android:layout_width="wrap_content"
android:layout_height="wrap_content"
android:padding="10dp"
android:background="@drawable/android_button" />Theandroid:backgroundattribute specifies the drawable resource to use for the button background (which, when saved atres/drawable/android.xml, is referenced as@drawable/android). This replaces the normal background image used for buttons throughout the system. In order for the drawable to change its image based on the button state, the image must be applied to the background. - To make the button do something when pressed, add the following code at the end of the
onCreate()method:final Button button = (Button) findViewById(R.id.button);
button.setOnClickListener(new OnClickListener() {
public void onClick(View v) {
// Perform action on clicks
Toast.makeText(HelloFormStuff.this, "Beep Bop", Toast.LENGTH_SHORT).show();
}
});This captures theButtonfrom the layout, then adds anView.OnClickListener. TheView.OnClickListenermust implement theonClick(View)callback method, which defines the action to be made when the button is clicked. In this example, aToastmessage will be displayed. - Now run the application.

For Download Appear should like this.
Senin, 14 Maret 2011
Kamis, 10 Maret 2011
Table Layout With Scrolling and Good Looking
in real time project maximum we have to use table layout , but in android table we can't see borders so we should use some other resources .
in table layout .
at tahe same time in table layout we have number of attributes
for Full Explanation regarding Table see my my previouse tutorial
<TableRow> // for single row i am placing two text fields
<TextView android:text="Invoice Date" android:textColor="#190707"
android:background="#ffffff" android:padding="10dip"
android:layout_marginTop="0.1dip" android:layout_marginLeft="0.1dip"
android:layout_marginRight="0.1dip" android:textStyle="bold" />
<TextView android:id="@+id/iTvDate" android:textColor="#190707"
android:text="09/03/2011" android:background="#ffffff"
android:layout_marginTop="0.1dip" android:layout_marginRight="0.1dip"
android:textStyle="bold" android:padding="10dip" />
</TableRow>

Rabu, 09 Maret 2011
creating key store file and *.apk file
If we want to install our app in specific mobile first we need to Generate two files
first one is Keystore file ( signing Application )
seconde one is *.apk file ( source file )
creating key store file and *.apk file
1-> right click on selected project ( should error free)

2-> click on export
3-> choose Export Android Application from Android Folder click on next

4-> select the project to export next click on next

5-> choose create new key store radio button for creating keystore file

6-> choose location from browse button and type password for keystore file

7-> click on next
8-> fill key cretion form with qualified values ( validity years above 24)

9 -> click next
10 -> select Destination APK file through browse button

11 -> click finish
12 -> finally you can get two files of key store and *.apk

for instruction to dowload click here
How to Check our Android App in our Device
Using Hardware Devices
Note: When developing on a device, keep in mind that you should still use the Android emulator to test your application on configurations that are not equivalent to those of your real device. Although the emulator does not allow you to test every device feature (such as the accelerometer), it does allow you to verify that your application functions properly on different versions of the Android platform, in different screen sizes and orientations, and more.Setting up a Device for Development
With an Android-powered device, you can develop and debug your Android applications just as you would on the emulator. Before you can start, there are just a few things to do:
- Declare your application as "debuggable" in your Android Manifest. In Eclipse, you can do this from the Application tab when viewing the Manifest (on the right side, set Debuggable to true). Otherwise, in the
AndroidManifest.xmlfile, addandroid:debuggable="true"to the<application>element. - Turn on "USB Debugging" on your device. On the device, go to the home screen, press MENU, select Applications > Development, then enable USB debugging.
- Setup your system to detect your device.
- If you're developing on Windows, you need to install a USB driver for adb. If you're using an Android Developer Phone (ADP), Nexus One, or Nexus S, see the Google Windows USB Driver. Otherwise, you can find a link to the appropriate OEM driver in the OEM USB Drivers document.
- If you're developing on Mac OS X, it just works. Skip this step.
- If you're developing on Ubuntu Linux, you need to add a rules file that contains a USB configuration for each type of device you want to use for development. Each device manufacturer uses a different vendor ID. The example rules files below show how to add an entry for a single vendor ID (the HTC vendor ID). In order to support more devices, you will need additional lines of the same format that provide a different value for the
SYSFS{idVendor}property. For other IDs, see the table of USB Vendor IDs, below. - Log in as root and create this file:
/etc/udev/rules.d/51-android.rules. For Gusty/Hardy, edit the file to read:- ( for etc folder in ubuntu choose places menu -> computer -> file system -> etc )
SUBSYSTEM=="usb", SYSFS{idVendor}=="0bb4", MODE="0666"
For Dapper, edit the file to read:SUBSYSTEM=="usb_device", SYSFS{idVendor}=="0bb4", MODE="0666" - Now execute:
chmod a+r /etc/udev/rules.d/51-android.rules
- for ICONIA-TAB-A500
- SUBSYSTEM=="usbdevice", SYSFS{idVendor}=="0502", MODE="0666"
- ( Edit above Command inrules.d documnet)
-- /home/User/Desktop/android-sdk-linux_86/platform-tools/adb devices
(Adb pth in sdk )
( it shows connected devices )
adb devices from your SDK platform-tools/ directory. If connected, you'll see the device name listed as a "device."If using Eclipse, run or debug as usual. You will be presented with a Device Chooser dialog that lists the available emulator(s) and connected device(s). Select the device upon which you want to install and run the application.
If using the Android Debug Bridge (adb), you can issue commands with the
-d flag to target your connected device.USB Vendor IDs
This table provides a reference to the vendor IDs needed in order to add USB device support on Linux. The USB Vendor ID is the value given to theSYSFS{idVendor} property in the rules file, as described in step 3, above.| Manufacturer | USB Vendor ID |
|---|---|
| Acer | 0502 |
| Dell | 413c |
| Foxconn | 0489 |
| Garmin-Asus | 091E |
| HTC | 0bb4 |
| Huawei | 12d1 |
| Kyocera | 0482 |
| LG | 1004 |
| Motorola | 22b8 |
| Nvidia | 0955 |
| Pantech | 10A9 |
| Samsung | 04e8 |
| Sharp | 04dd |
| Sony Ericsson | 0fce |
| ZTE | 19D2 |
Selasa, 08 Maret 2011
How to display borders in TableLayouts
According to the Android developer guide, border lines are not displayed for table layouts. However, often you will find the need to do things such as having vertical separators between table cells and borders around table rows. There are two different methods that I can think of to achieve this.
METHOD 1: USE OF BACKGROUND COLOUR AND LAYOUT MARGINS
- Give the TableLayout a background colour. (purple – #ff00f0 – in my example)
- Give the TableRow a different background colour (black in my example) and a layout_margin (2dp). The layout_margin is the width of the “border”.
This will essentially give a border around each row in the TableLayout, as shown in Figure 1 (first table). The code snippet for the XML-layout file looks like this:
<TableLayout android:layout_width="wrap_content"
 android:layout_height="wrap_content" android:stretchColumns="*"
 android:background="#ff00f0">
 <TableRow android:layout_margin="2dp" android:background="#000000">
  <TextView android:text="first column" />
  <TextView android:text="second column" />
  <Button android:text="third Column" />
 </TableRow>
 <TableRow android:layout_margin="2dp" android:background="#000000">
  <TextView android:text="first column" />
  <TextView android:text="second column" />
  <Button android:text="third Column" />
 </TableRow>
</TableLayout>
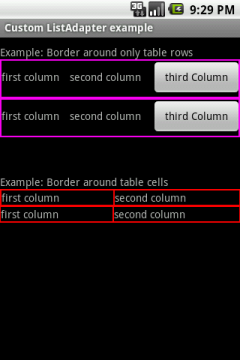
NOTE: In a proper application, you are more likely to use this in conjunction with a ListView. i.e. represent each list item as a table row.However, if you want to have vertical borders between cells it gets trickier. This is because some views such as EditView and Buttons have their own “padding”/transparency that makes it tedious to specify everything in a XML file. You can see how this looks in Figure 1 (2nd table) Steps to achieve this is as follows:
- Give the TableLayout a background colour (red)
- Give a layout_margin to TableRow so that it will display the outer border (similar to previous example) for each row.
- Give each view within a TableRow its own background colour. Otherwise it will be inherited from the parent view (which is red). This is where the things can get tricky depending on your views. Have a play around and see what works for you the best.
Layout code example:<TableLayout android:layout_width="wrap_content"
android:layout_height="wrap_content" android:stretchColumns="*"
android:background="#ff0000">
<TableRow android:layout_margin="1dp">
<TextView android:text="first column" android:background="#000000"
android:layout_margin="1dp" />
<TextView android:text="second column" android:background="#000000"
android:layout_margin="1dp" />
</TableRow>
...
</TableLayout>Creating Table Layout using textView and Table Border :<?xml version="1.0" encoding="utf-8"?>
<TableLayout
xmlns:android="http://schemas.android.com/apk/res/android"
android:layout_width="wrap_content"
android:layout_height="wrap_content"
android:stretchColumns="*"
android:background="#000000">
<TableRow android:layout_margin="1dip">
<TextView android:text="Invoice Number"android:background="#ffffff"android:layout_margin="1dip"android:padding="15dip"/>
<TextView android:id="@+id/tIN" android:text="9912326989"android:background="#ffffff" android:layout_margin="1dip"android:padding="15dip" />
</TableRow>
<TableRowandroid:layout_margin="1dip">
<TextView android:text="Invoice Data"android:background="#ffffff"android:layout_margin="1dip"android:padding="15dip" />
<TextView android:id="@+id/Idata"android:text="demo data" android:background="#ffffff"android:layout_margin="1dip" android:padding="15dip" />
</TableRow>
<TableRow android:layout_margin="1dip">
<TextView android:text="Operation Type"android:background="#ffffff" android:layout_margin="1dip"android:padding="15dip" />
<TextView android:id="@+id/tOT"android:text="ok" android:background="#ffffff"android:layout_margin="1dip" android:padding="15dip" />
</TableRow>
<TableRow android:layout_margin="1dip">
<TextView android:text="amount"android:background="#ffffff" android:layout_margin="1dip"android:padding="15dip" />
<TextView android:id="@+id/tAmount"android:text="Paid"android:background="#ffffff"android:layout_margin="1dip"android:padding="15dip" />
</TableRow>
<TableRow android:layout_margin="1dip">
<TextView android:text="Payment"android:background="#ffffff"android:layout_margin="1dip"android:padding="15dip" />
<TextView android:id="@+id/tPay"android:text="20000rs" android:background="#ffffff"android:layout_margin="1dip" android:padding="15dip" />
</TableRow>
<TableRow android:layout_margin="1dip">
<TextView android:text="Usual Payment Type"android:singleLine="false" android:background="#ffffff"android:layout_margin="1dip" android:padding="15dip" />
<TextView android:id="@+id/amount" android:text="normal"android:background="#ffffff" android:layout_margin="1dip"android:padding="15dip" />
</TableRow>
</TableLayout>
For Complete Source Code Click here

Jumat, 04 Maret 2011
Multicolumn ListView in Android
Ever since I started programming on the Android platform, I have been wondering when the SDK would include a ready-made multicolumn
I finally saw a blog post which customized
Here is the XML for each row, main point being that we put three
Notice how you can format each
Here is how you could populate that
Main class :
-------------
import java.util.ArrayList;
import java.util.Calendar;
import java.util.Date;
import java.util.HashMap;
import android.app.ListActivity;
import android.os.Bundle;
import android.util.Log;
import android.widget.ListView;
import android.widget.SimpleAdapter;
public class MultiList extends ListActivity {
ListView lv;
SimpleAdapter sd;
@Override
public void onCreate(Bundle savedInstanceState) {
try {
super.onCreate(savedInstanceState);
Calendar c=Calendar.getInstance();
lv=getListView();
ArrayList<HashMap<String,String>> alist=new ArrayList<HashMap<String,String>>();
HashMap<String, String>map=new HashMap<String, String>();
map.put("Date","Date :"+c.get(Calendar.DATE)); // printing date
map.put("Month", "Month :"+(c.get(Calendar.MONTH)+1)); // printing month
map.put("Time", "Time :"+new Date().toString()); // printing Date
alist.add(map);
sd=new SimpleAdapter(this,alist,R.layout.rows,new String[]{"Date","Month","Time"},new int[]{R.id.t1,R.id.t2,R.id.t3});
lv.setAdapter(sd);
}
catch (Exception e) {
Log.w("Sravan", e.toString());
}
}
}
The main point here is that the
Putting the above pieces of code into Caltroid produces results that look like this:
ListView (or listbox as it is often called in other frameworks). One could of course construct such a thing by slapping regular ListViews side by side and then painfully adding code to keep them all in sync when scrolled and so on. It felt such a hack that I used GridView instead. GridView is not really a great list, though, because the cells will all be formatted the same. There are other issues besides that, but for me that was the main one.I finally saw a blog post which customized
ListView to put Three TextViews vertically into one line. It was pretty simple going from there to one that would display three TextViews side-by-side. The main layout XML file could define ListView something like this:<!-- main.xml -->
<?xml version="1.0" encoding="utf-8"?>
<LinearLayout xmlns:android="http://schemas.android.com/apk/res/android"
android:orientation="vertical"
android:layout_width="fill_parent"
android:layout_height="fill_parent"
>
<ListView
android:id="@+id/lv"
android:layout_width="wrap_content"
android:layout_height="wrap_content"
/>
</LinearLayout>
TextViews in LinearLayout with horizontal orientation:<?xml version="1.0" encoding="utf-8"?>
<!-- row.xml -->
<?xml version="1.0" encoding="UTF-8"?>
<LinearLayout xmlns:android="http://schemas.android.com/apk/res/android"
android:orientation="horizontal"
android:paddingTop="4dip"
android:paddingBottom="6dip"
android:layout_width="fill_parent"
android:layout_height="fill_parent">
<TextView
android:id="@+id/t1"
android:layout_width="90dip"
android:layout_height="wrap_content"
android:text="text1"/>
<TextView
android:id="@+id/t2"
android:layout_width="90dip"
android:layout_height="wrap_content"
android:layout_weight="1"
android:text="text2"/>
<TextView
android:id="@+id/t3"
android:layout_width="50dip"
android:layout_height="wrap_content"
android:layout_weight="1"
android:text="text3" />
</LinearLayout>
TextView separately. There is no column separator, but something decent should not be too hard to whip up if desired. My understanding is that the screen width is supposed to be 160 dip, but for some reason I had to use width values that actually add up to more than that, as well as using layout weight to grow some fields proportionally so that when you switch to landscape mode things are still nicely aligned. I would have expected specifying widths in dip would have automatically done that.Here is how you could populate that
ListView with data:ListView list =getListView();
-------------
import java.util.ArrayList;
import java.util.Calendar;
import java.util.Date;
import java.util.HashMap;
import android.app.ListActivity;
import android.os.Bundle;
import android.util.Log;
import android.widget.ListView;
import android.widget.SimpleAdapter;
public class MultiList extends ListActivity {
ListView lv;
SimpleAdapter sd;
@Override
public void onCreate(Bundle savedInstanceState) {
try {
super.onCreate(savedInstanceState);
Calendar c=Calendar.getInstance();
lv=getListView();
ArrayList<HashMap<String,String>> alist=new ArrayList<HashMap<String,String>>();
HashMap<String, String>map=new HashMap<String, String>();
map.put("Date","Date :"+c.get(Calendar.DATE)); // printing date
map.put("Month", "Month :"+(c.get(Calendar.MONTH)+1)); // printing month
map.put("Time", "Time :"+new Date().toString()); // printing Date
alist.add(map);
sd=new SimpleAdapter(this,alist,R.layout.rows,new String[]{"Date","Month","Time"},new int[]{R.id.t1,R.id.t2,R.id.t3});
lv.setAdapter(sd);
}
catch (Exception e) {
Log.w("Sravan", e.toString());
}
}
}
The main point here is that the
SimpleAdapter requires the data to be in a List, where each entry is a Map. In my case, I simulate the columns by putting in three entries into each of the maps, and the maps each have the same keys. The adapter then maps the key values (like "Date") to the corresponding TextView (R.id.t1).Putting the above pieces of code into Caltroid produces results that look like this:
 | |||||||||||||||||||||
| Final Screen | For Complete Project Source code Click Here |
Kamis, 03 Maret 2011
Android Code Style Guidelines for Contributors
Code Style Guidelines for Contributors
The rules below are not guidelines or recommendations, but strict rules. Contributions to Android generally will not be accepted if they do not adhere to these rules.
Not all existing code follows these rules, but all new code is expected to.
Java Language Rules
We follow standard Java coding conventions. We add a few rules:
- Exceptions: Never catch and ignore them without explanation.
- Exceptions: do not catch generic Exception, except in library code at the root of the stack.
- Finalizers: generally don't use them.
- Imports: Fully qualify imports
Java Library Rules
There are conventions for using Android's Java libraries and tools. In some cases, the convention has changed in important ways and older code might use a deprecated pattern or library. When working with such code, it's okay to continue the existing style (see Consistency). When creating new components never use deprecated libraries.
Java Style Rules
Programs are much easier to maintain when all files have a consistent style. We follow the standard Java coding style, as defined by Sun in their Code Conventions for the Java Programming Language, with a few exceptions and additions. This style guide is comprehensive and detailed and is in common usage in the Java community.
In addition, we enforce the following style rules:
- Comments/Javadoc: write it; use standard style
- Short methods: don't write giant methods
- Fields: should either be at the top of the file, or immediately before the methods that use them
- Local variables: limit the scope
- Imports: android; third party alphabetical; java(x)
- Indentation: 4 spaces, no tabs.
- Line length: 100 columns
- Field names: Non-public, non-static fields start with m.
- Braces: Opening braces don't go on their own line.
- Annotations: Use the standard annotations.
- Acronyms are words: Treat acronyms as words in names, yielding XmlHttpRequest, getUrl(), etc.
- TODO style: "TODO: write this description"
- Consistency: Look at what's around you!
- Logging: Be careful with logging. It's expensive.
Javatests Style Rules
- Naming test methods: testMethod_specificCase is ok
Java Language Rules
Exceptions: do not ignore
Sometimes it is tempting to write code that completely ignores an exception like this:
void setServerPort(String value) {
    try {
        serverPort = Integer.parseInt(value);
    } catch (NumberFormatException e) { }
}
You must never do this. While you may think that your code will never encounter this error condition or that it is not important to handle it, ignoring exceptions like above creates mines in your code for someone else to trip over some day. You must handle every Exception in your code in some principled way. The specific handling varies depending on the case.
Anytime somebody has an empty catch clause they should have a creepy feeling. There are definitely times when it is actually the correct thing to do, but at least you have to think about it. In Java you can't escape the creepy feeling. -James Gosling
Acceptable alternatives (in order of preference) are:
- Throw the exception up to the caller of your method.
void setServerPort(String value) throws NumberFormatException {
    serverPort = Integer.parseInt(value);
} - Throw a new exception that's appropriate to your level of abstraction.
void setServerPort(String value) throws ConfigurationException {
    try {
        serverPort = Integer.parseInt(value);
    } catch (NumberFormatException e) {
        throw new ConfigurationException("Port " + value + " is not valid.");
    }
} - Handle the error gracefully and substitute an appropriate value in the catch {} block.
/** Set port. If value is not a valid number, 80 is substituted. */
void setServerPort(String value) {
    try {
        serverPort = Integer.parseInt(value);
    } catch (NumberFormatException e) {
        serverPort = 80;  // default port for server
    }
} - Catch the Exception and throw a new RuntimeException. This is dangerous: only do it if you are positive that if this error occurs, the appropriate thing to do is crash.
/** Set port. If value is not a valid number, die. */
Note that the original exception is passed to the constructor for RuntimeException. If your code must compile under Java 1.3, you will need to omit the exception that is the cause.
void setServerPort(String value) {
try {
serverPort = Integer.parseInt(value);
} catch (NumberFormatException e) {
throw new RuntimeException("port " + value " is invalid, ", e);
}
} - Last resort: if you are confident that actually ignoring the exception is appropriate then you may ignore it, but you must also comment why with a good reason:
/** If value is not a valid number, original port number is used. */
void setServerPort(String value) {
    try {
        serverPort = Integer.parseInt(value);
    } catch (NumberFormatException e) {
        // Method is documented to just ignore invalid user input.
        // serverPort will just be unchanged.
    }
}
Exceptions: do not catch generic Exception
Sometimes it is tempting to be lazy when catching exceptions and do something like this:
try {
    someComplicatedIOFunction();        // may throw IOException
    someComplicatedParsingFunction();   // may throw ParsingException
    someComplicatedSecurityFunction();  // may throw SecurityException
    // phew, made it all the way
} catch (Exception e) {               // I'll just catch all exceptions
    handleError();                      // with one generic handler!
}
You should not do this. In almost all cases it is inappropriate to catch generic Exception or Throwable, preferably not Throwable, because it includes Error exceptions as well. It is very dangerous. It means that Exceptions you never expected (including RuntimeExceptions like ClassCastException) end up getting caught in application-level error handling. It obscures the failure handling properties of your code. It means if someone adds a new type of Exception in the code you're calling, the compiler won't help you realize you need to handle that error differently. And in most cases you shouldn't be handling different types of exception the same way, anyway.
There are rare exceptions to this rule: certain test code and top-level code where you want to catch all kinds of errors (to prevent them from showing up in a UI, or to keep a batch job running). In that case you may catch generic Exception (or Throwable) and handle the error appropriately. You should think very carefully before doing this, though, and put in comments explaining why it is safe in this place.
Alternatives to catching generic Exception:
- Catch each exception separately as separate catch blocks after a single try. This can be awkward but is still preferable to catching all Exceptions. Beware repeating too much code in the catch blocks.
- Refactor your code to have more fine-grained error handling, with multiple try blocks. Split up the IO from the parsing, handle errors separately in each case.
- Rethrow the exception. Many times you don't need to catch the exception at this level anyway, just let the method throw it.
Remember: exceptions are your friend! When the compiler complains you're not catching an exception, don't scowl. Smile: the compiler just made it easier for you to catch runtime problems in your code.
Finalizers
What it is: Finalizers are a way to have a chunk of code executed when an object is garbage collected.
Pros: can be handy for doing cleanup, particularly of external resources.
Cons: there are no guarantees as to when a finalizer will be called, or even that it will be called at all.
Decision: we don't use finalizers. In most cases, you can do what you need from a finalizer with good exception handling. If you absolutely need it, define a close() method (or the like) and document exactly when that method needs to be called. See InputStream for an example. In this case it is appropriate but not required to print a short log message from the finalizer, as long as it is not expected to flood the logs.
Imports
Wildcards in imports
What it is: When you want to use class Bar from package foo,there are two possible ways to import it:
import foo.*;import foo.Bar;
Pros of #1: Potentially reduces the number of import statements.
Pros of #2: Makes it obvious what classes are actually used. Makes code more readable for maintainers.
Decision: Use style #2 for importing all Android code. An explicit exception is made for java standard libraries (java.util.*, java.io.*, etc.) and unit test code (junit.framework.*).
Comments/Javadoc
Every file should have a copyright statement at the top. Then a package statement and import statements should follow, each block separated by a blank line. And then there is the class or interface declaration. In the Javadoc comments, describe what the class or interface does.
/*
 * Copyright (C) 2010 The Android Open Source Project
 *
 * Licensed under the Apache License, Version 2.0 (the "License");
 * you may not use this file except in compliance with the License.
 * You may obtain a copy of the License at
 *
 *      http://www.apache.org/licenses/LICENSE-2.0
 *
 * Unless required by applicable law or agreed to in writing, software
 * distributed under the License is distributed on an "AS IS" BASIS,
 * WITHOUT WARRANTIES OR CONDITIONS OF ANY KIND, either express or implied.
 * See the License for the specific language governing permissions and
 * limitations under the License.
 */

package com.android.internal.foo;

import android.os.Blah;
import android.view.Yada;

import java.sql.ResultSet;
import java.sql.SQLException;

/**
 * Does X and Y and provides an abstraction for Z.
 */
public class Foo {
    ...
}
Every class and nontrivial public method you write must contain a Javadoc comment with at least one sentence describing what the class or method does. This sentence should start with a 3rd person descriptive verb. Examples:
/** Returns the correctly rounded positive square root of a double value. */
static double sqrt(double a) {
}

/**
 * Constructs a new String by converting the specified array of
 * bytes using the platform's default character encoding.
 */
public String(byte[] bytes) {
}
You do not need to write Javadoc for trivial get and set methods such as setFoo() if all your Javadoc would say is "sets Foo". If the method does something more complex (such as enforcing a constraint or having an important side effect), then you must document it. And if it's not obvious what the property "Foo" means, you should document it.
Every method you write, whether public or otherwise, would benefit from Javadoc. Public methods are part of an API and therefore require Javadoc.
Android does not currently enforce a specific style for writing Javadoc comments, but you should follow the Sun Javadoc conventions.
Short methods
To the extent that it is feasible, methods should be kept small and focused. It is, however, recognized that long methods are sometimes appropriate, so no hard limit is placed on method length. If a method exceeds 40 lines or so, think about whether it can be broken up without harming the structure of the program.
Local variables
The scope of local variables should be kept to a minimum (Effective Java Item 29). By doing so, you increase the readability and maintainability of your code and reduce the likelihood of error. Each variable should be declared in the innermost block that encloses all uses of the variable.
Local variables should be declared at the point they are first used. Nearly every local variable declaration should contain an initializer. If you don't yet have enough information to initialize a variable sensibly, you should postpone the declaration until you do.
One exception to this rule concerns try-catch statements. If a variable is initialized with the return value of a method that throws a checked exception, it must be initialized inside a try block. If the value must be used outside of the try block, then it must be declared before the try block, where it cannot yet be sensibly initialized:
// Instantiate class cl, which represents some sort of Set
Set s = null;
try {
    s = (Set) cl.newInstance();
} catch(IllegalAccessException e) {
    throw new IllegalArgumentException(cl + " not accessible");
} catch(InstantiationException e) {
    throw new IllegalArgumentException(cl + " not instantiable");
}

// Exercise the set
s.addAll(Arrays.asList(args));
But even this case can be avoided by encapsulating the try-catch block in a method:
Set createSet(Class cl) {
    // Instantiate class cl, which represents some sort of Set
    try {
        return (Set) cl.newInstance();
    } catch(IllegalAccessException e) {
        throw new IllegalArgumentException(cl + " not accessible");
    } catch(InstantiationException e) {
        throw new IllegalArgumentException(cl + " not instantiable");
    }
}

...

// Exercise the set
Set s = createSet(cl);
s.addAll(Arrays.asList(args));
Loop variables should be declared in the for statement itself unless there is a compelling reason to do otherwise:
for (int i = 0; i n; i++) {
    doSomething(i);
}

for (Iterator i = c.iterator(); i.hasNext(); ) {
    doSomethingElse(i.next());
}
Imports
The ordering of import statements is:
- Android imports
- Imports from third parties (com, junit, net, org)
- java and javax
To exactly match the IDE settings, the imports should be:
- Alphabetical within each grouping.
- Capital letters are considered to come before lower case letter (e.g. Z before a).
- There should be a blank line between each major grouping (android, com, junit, net, org, java, javax).
Why?
Originally there was no style requirement on the ordering. This meant that the IDE's were either always changing the ordering, or IDE developers had to disable the automatic import management features and maintain the imports by hand. This was deemed bad. When java-style was asked, the preferred styles were all over the map. It pretty much came down to our needing to "pick an ordering and be consistent." So we chose a style, updated the style guide, and made the IDEs obey it. We expect that as IDE users work on the code, the imports in all of the packages will end up matching this pattern without any extra engineering effort.
The style chosen such that:
- The imports people want to look at first tend to be at the top (android)
- The imports people want to look at least tend to be at the bottom (java)
- Humans can easily follow the style
- The IDE's can follow the style
What about static imports?
The use and location of static imports have been mildly controversial issues. Some people would prefer static imports to be interspersed with the remaining imports, some would prefer them reside above or below all other imports. Additinally, we have not yet come up with a way to make all IDEs use the same ordering.
Since most people consider this a low priority issue, just use your judgement and please be consistent.
Indentation
We use 4 space indents for blocks. We never use tabs. When in doubt, be consistent with code around you.
We use 8 space indents for line wraps, including function calls and assignments. For example, this is correct:
Instrument i =
        someLongExpression(that, wouldNotFit, on, one, line);
and this is not correct:
Instrument i =
    someLongExpression(that, wouldNotFit, on, one, line);
Field Names
- Non-public, non-static field names start with m.
- Static field names start with s.
- Other fields start with a lower case letter.
- Public static final fields (constants) are ALL_CAPS_WITH_UNDERSCORES.
For example:
public class MyClass {
    public static final int SOME_CONSTANT = 42;
    public int publicField;
    private static MyClass sSingleton;
    int mPackagePrivate;
    private int mPrivate;
    protected int mProtected;
}
Braces
Braces do not go on their own line; they go on the same line as the code before them. So:
class MyClass {
    int func() {
        if (something) {
            // ...
        } else if (somethingElse) {
            // ...
        } else {
            // ...
        }
    }
}
We require braces around the statements for a conditional. Except, if the entire conditional (the condition and the body) fit on one line, you may (but are not obligated to) put it all on one line. That is, this is legal:
if (condition) {
    body(); // ok
}
if (condition) body(); // ok
but this is still illegal:
if (condition)
    body(); // bad
Line length
Each line of text in your code should be at most 100 characters long.
There has been lots of discussion about this rule and the decision remains that 100 characters is the maximum.
Exception: if a comment line contains an example command or a literal URL longer than 100 characters, that line may be longer than 100 characters for ease of cut and paste.
Exception: import lines can go over the limit because humans rarely see them. This also simplifies tool writing.
Java 1.5 Annotations
Annotations should precede other modifiers for the same language element. Simple marker annotations (e.g. @Override) can be listed on the same line with the language element. If there are multiple annotations, or parameterized annotations, they should each be listed one-per-line in alphabetical order.
Android -standard practices for the three predefined annotations in Java 1.5's are:
@Deprecated
The @Deprecated annotation must be used whenever the use of the annotated element is discouraged. If you use the @Deprecated annotation, you must also have a @deprecated Javadoc tag and it should name an alternate implementation. In addition, remember that a @Deprecated method is still supposed to work.
If you see old code that has a @deprecated Javadoc tag, please add the @Deprecated annotation.
@Override
The @Override annotation must be used whenever a method overrides the declaration or implementation from a super-class.
For example, if you use the @inheritdocs Javadoc tag, and derive from a class (not an interface), you must also annotate that the method @Overrides the parent class's method.
@SuppressWarnings
The @SuppressWarnings annotation should only be used under circumstances where it is impossible to eliminate a warning. If a warning passes this "impossible to eliminate" test, the @SuppressWarnings annotation must be used, so as to ensure that all warnings reflect actual problems in the code.
When a @SuppressWarnings annotation is necessary, it must be prefixed with a TODO comment that explains the "impossible to eliminate" condition. This will normally identify an offending class that has an awkward interface. For example:
// TODO: The third-party class com.third.useful.Utility.rotate() needs generics
@SuppressWarnings("generic-cast")
List<String> blix = Utility.rotate(blax);
When a @SuppressWarnings annotation is required, the code should be refactored to isolate the software elements where the annotation applies.
Acronyms in names
Treat acronyms and abbreviations as words. The names are much more readable:
| Good | Bad |
| XmlHttpRequest | XMLHTTPRequest |
| getCustomerId | getCustomerID |
This style rule also applies when an acronym or abbreviation is the entire name:
| Good | Bad |
| class Html | class HTML |
| String url; | String URL; |
| long id; | long ID; |
Both the JDK and the Android code bases are very inconsistent with regards to acronyms, therefore, it is virtually impossible to be consistent with the code around you. Bite the bullet, and treat acronyms as words.
For further justifications of this style rule, see Effective Java Item 38 and Java Puzzlers Number 68.
TODO style
Use TODO comments for code that is temporary, a short-term solution, or good-enough but not perfect.
TODOs should include the string TODO in all caps, followed by a colon:
// TODO: Remove this code after the UrlTable2 has been checked in.

// TODO: Change this to use a flag instead of a constant.
If your TODO is of the form "At a future date do something" make sure that you either include a very specific date ("Fix by November 2005") or a very specific event ("Remove this code after all production mixers understand protocol V7.").
Consistency
Our parting thought: BE CONSISTENT. If you're editing code, take a few minutes to look at the code around you and determine its style. If they use spaces around their if clauses, you should too. If their comments have little boxes of stars around them, make your comments have little boxes of stars around them too.
The point of having style guidelines is to have a common vocabulary of coding, so people can concentrate on what you're saying, rather than on how you're saying it. We present global style rules here so people know the vocabulary. But local style is also important. If code you add to a a file looks drastically different from the existing code around it, it throws readers out of their rhythm when they go to read it. Try to avoid this.
Logging
While logging is necessary it has a significantly negative impact on performance and quickly loses its usefulness if it's not kept reasonably terse. The logging facilities provides five different levels of logging. Below are the different levels and when and how they should be used.
- ERROR: This level of logging should be used when something fatal has happened, i.e. something that will have user-visible consequences and won't be recoverable without explicitly deleting some data, uninstalling applications, wiping the data partitions or reflashing the entire phone (or worse). This level is always logged. Issues that justify some logging at the ERROR level are typically good candidates to be reported to a statistics-gathering server.
- WARNING: This level of logging should used when something serious and unexpected happened, i.e. something that will have user-visible consequences but is likely to be recoverable without data loss by performing some explicit action, ranging from waiting or restarting an app all the way to re-downloading a new version of an application or rebooting the device. This level is always logged. Issues that justify some logging at the WARNING level might also be considered for reporting to a statistics-gathering server.
- INFORMATIVE: This level of logging should used be to note that something interesting to most people happened, i.e. when a situation is detected that is likely to have widespread impact, though isn't necessarily an error. Such a condition should only be logged by a module that reasonably believes that it is the most authoritative in that domain (to avoid duplicate logging by non-authoritative components). This level is always logged.
- DEBUG: This level of logging should be used to further note what is happening on the device that could be relevant to investigate and debug unexpected behaviors. You should log only what is needed to gather enough information about what is going on about your component. If your debug logs are dominating the log then you probably should be using verbose logging. This level will be logged, even on release builds, and is required to be surrounded by an if (LOCAL_LOG) or if (LOCAL_LOGD) block, where LOCAL_LOG[D] is defined in your class or subcomponent, so that there can exist a possibility to disable all such logging. There must therefore be no active logic in an if (LOCAL_LOG) block. All the string building for the log also needs to be placed inside the if (LOCAL_LOG) block. The logging call should not be re-factored out into a method call if it is going to cause the string building to take place outside of the if (LOCAL_LOG) block. There is some code that still says if (localLOGV). This is considered acceptable as well, although the name is nonstandard.
- VERBOSE: This level of logging should be used for everything else. This level will only be logged on debug builds and should be surrounded by if (LOCAL_LOGV) block (or equivalent) so that it can be compiled out by default. Any string building will be stripped out of release builds and needs to appear inside the if (LOCAL_LOGV) block.
Note: Within a given module, other than at the VERBOSE level, an error should only be reported once if possible: within a single chain of function calls within a module, only the innermost function should return the error, and callers in the same module should only add some logging if that significantly helps to isolate the issue.
Note: In a chain of modules, other than at the VERBOSE level, when a lower-level module detects invalid data coming from a higher-level module, the lower-level module should only log this situation to the DEBUG log, and only if logging provides information that is not otherwise available to the caller. Specifically, there is no need to log situations where an exception is thrown (the exception should contain all the relevant information), or where the only information being logged is contained in an error code. This is especially important in the interaction between the framework and applications, and conditions caused by third-party applications that are properly handled by the framework should not trigger logging higher than the DEBUG level. The only situations that should trigger logging at the INFORMATIVE level or higher is when a module or application detects an error at its own level or coming from a lower level.
Note: When a condition that would normally justify some logging is likely to occur many times, it can be a good idea to implement some rate-limiting mechanism to prevent overflowing the logs with many duplicate copies of the same (or very similar) information.
Note: Losses of network connectivity are considered common and fully expected and should not be logged gratuitously. A loss of network connectivity that has consequences within an app should be logged at the DEBUG or VERBOSE level (depending on whether the consequences are serious enough and unexpected enough to be logged in a release build).
Note: A full filesystem on a filesystem that is acceessible to or on behalf of third-party applications should not be logged at a level higher than INFORMATIVE.
Note: Invalid data coming from any untrusted source (including any file on shared storage, or data coming through just about any network connections) is considered expected and should not trigger any logging at a level higher then DEBUG when it's detected to be invalid (and even then logging should be as limited as possible).
Note: Keep in mind that the '+' operator, when used on Strings, implicitly creates a StringBuilder with the default buffer size (16 characters) and potentially quite a few other temporary String objects, i.e. that explicitly creating StringBuilders isn't more expensive than relying on the default '+' operator (and can be a lot more efficient in fact). Also keep in mind that code that calls Log.v() is compiled and executed on release builds, including building the strings, even if the logs aren't being read.
Note: Any logging that is meant to be read by other people and to be available in release builds should be terse without being cryptic, and should be reasonably understandable. This includes all logging up to the DEBUG level.
Note: When possible, logging should be kept on a single line if it makes sense. Line lengths up to 80 or 100 characters are perfectly acceptable, while lengths longer than about 130 or 160 characters (including the length of the tag) should be avoided if possible.
Note: Logging that reports successes should never be used at levels higher than VERBOSE.
Note: Temporary logging that is used to diagnose an issue that's hard to reproduce should be kept at the DEBUG or VERBOSE level, and should be enclosed by if blocks that allow to disable it entirely at compile-time.
Note: Be careful about security leaks through the log. Private information should be avoided. Information about protected content must definitely be avoided. This is especially important when writing framework code as it's not easy to know in advance what will and will not be private information or protected content.
Note: System.out.println() (or printf() for native code) should never be used. System.out and System.err get redirected to /dev/null, so your print statements will have no visible effects. However, all the string building that happens for these calls still gets executed.
Note: The golden rule of logging is that your logs may not unnecessarily push other logs out of the buffer, just as others may not push out yours.
Javatests Style Rules
Naming test methods
When naming test methods, you can use an underscore to seperate what is being tested from the specific case being tested. This style makes it easier to see exactly what cases are being tested.
testMethod_specificCase1 testMethod_specificCase2
void testIsDistinguishable_protanopia() {
    ColorMatcher colorMatcher = new ColorMatcher(PROTANOPIA)
    assertFalse(colorMatcher.isDistinguishable(Color.RED, Color.BLACK))
    assertTrue(colorMatcher.isDistinguishable(Color.X, Color.Y))
}
Langganan:
Komentar (Atom)