Rabu, 09 Maret 2011

How to Check our Android App in our Device

Using Hardware Devices

Note: When developing on a device, keep in mind that you should still use the Android emulator to test your application on configurations that are not equivalent to those of your real device. Although the emulator does not allow you to test every device feature (such as the accelerometer), it does allow you to verify that your application functions properly on different versions of the Android platform, in different screen sizes and orientations, and more.

Setting up a Device for Development

With an Android-powered device, you can develop and debug your Android applications just as you would on the emulator. Before you can start, there are just a few things to do:
  1. Declare your application as "debuggable" in your Android Manifest. In Eclipse, you can do this from the Application tab when viewing the Manifest (on the right side, set Debuggable to true). Otherwise, in the AndroidManifest.xml file, add android:debuggable="true" to the <application> element.

  2. Turn on "USB Debugging" on your device. On the device, go to the home screen, press MENU, select Applications > Development, then enable USB debugging.
  3. Setup your system to detect your device.
    • If you're developing on Windows, you need to install a USB driver for adb. If you're using an Android Developer Phone (ADP), Nexus One, or Nexus S, see the Google Windows USB Driver. Otherwise, you can find a link to the appropriate OEM driver in the OEM USB Drivers document.
    • If you're developing on Mac OS X, it just works. Skip this step.
    • If you're developing on Ubuntu Linux, you need to add a rules file that contains a USB configuration for each type of device you want to use for development. Each device manufacturer uses a different vendor ID. The example rules files below show how to add an entry for a single vendor ID (the HTC vendor ID). In order to support more devices, you will need additional lines of the same format that provide a different value for the SYSFS{idVendor} property. For other IDs, see the table of USB Vendor IDs, below. 
    • Log in as root and create this file: /etc/udev/rules.d/51-android.rules. For Gusty/Hardy, edit the file to read:
            ( for etc folder in ubuntu choose places menu -> computer -> file system -> etc )

      SUBSYSTEM=="usb", SYSFS{idVendor}=="0bb4", MODE="0666"
      For Dapper, edit the file to read:
      SUBSYSTEM=="usb_device", SYSFS{idVendor}=="0bb4", MODE="0666"
    • Now execute:
      chmod a+r /etc/udev/rules.d/51-android.rules
    •  
  4. for ICONIA-TAB-A500
  5. SUBSYSTEM=="usbdevice", SYSFS{idVendor}=="0502", MODE="0666"
  6. ( Edit above Command inrules.d documnet)
5-> for Checking  open  terminal type following Command
-- /home/User/Desktop/android-sdk-linux_86/platform-tools/adb devices
(Adb pth in sdk )
( it shows connected devices )
    You can verify that your device is connected by executing adb devices from your SDK platform-tools/ directory. If connected, you'll see the device name listed as a "device."
    If using Eclipse, run or debug as usual. You will be presented with a Device Chooser dialog that lists the available emulator(s) and connected device(s). Select the device upon which you want to install and run the application.
    If using the Android Debug Bridge (adb), you can issue commands with the -d flag to target your connected device.

    USB Vendor IDs

    This table provides a reference to the vendor IDs needed in order to add USB device support on Linux. The USB Vendor ID is the value given to the SYSFS{idVendor} property in the rules file, as described in step 3, above.
    ManufacturerUSB Vendor ID
    Acer 0502
    Dell 413c
    Foxconn 0489
    Garmin-Asus 091E
    HTC 0bb4
    Huawei 12d1
    Kyocera 0482
    LG 1004
    Motorola 22b8
    Nvidia 0955
    Pantech 10A9
    Samsung 04e8
    Sharp 04dd
    Sony Ericsson 0fce
    ZTE 19D2


    Selasa, 08 Maret 2011

    How to display borders in TableLayouts


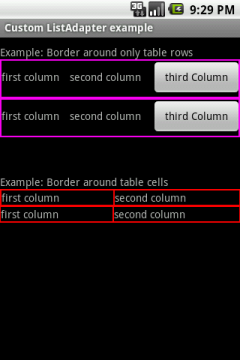
    According to the Android developer guide, border lines are not displayed for table layouts. However, often you will find the need to do things such as having vertical separators between table cells and borders around table rows. There are two different methods that I can think of to achieve this.

    METHOD 1: USE OF BACKGROUND COLOUR AND LAYOUT MARGINS

    1. Give the TableLayout a background colour. (purple – #ff00f0 – in my example)
    2. Give the TableRow a different background colour (black in my example) and a layout_margin (2dp). The layout_margin is the width of the “border”.
    This will essentially give a border around each row in the TableLayout, as shown in Figure 1 (first table). The code snippet for the XML-layout file looks like this:
    <TableLayout android:layout_width="wrap_content"
    android:layout_height="wrap_content" android:stretchColumns="*"
    android:background="#ff00f0">
    <TableRow android:layout_margin="2dp" android:background="#000000">
    <TextView android:text="first column" />
    <TextView android:text="second column" />
    <Button android:text="third Column" />
    </TableRow>
    <TableRow android:layout_margin="2dp" android:background="#000000">
    <TextView android:text="first column" />
    <TextView android:text="second column" />
    <Button android:text="third Column" />
    </TableRow>
    </TableLayout>
    NOTE: In a proper application, you are more likely to use this in conjunction with a ListView. i.e. represent each list item as a table row.
    However, if you want to have vertical borders between cells it gets trickier. This is because some views such as EditView and Buttons have their own “padding”/transparency that makes it tedious to specify everything in a XML file. You can see how this looks in Figure 1 (2nd table) Steps to achieve this is as follows:
    1. Give the TableLayout a background colour (red)

    2. Give a layout_margin to TableRow so that it will display the outer border (similar to previous example) for each row.

    3. Give each view within a TableRow its own background colour. Otherwise it will be inherited from the parent view (which is red). This is where the things can get tricky depending on your views. Have a play around and see what works for you the best.

    Layout code example:
    <TableLayout android:layout_width="wrap_content"
    android:layout_height="wrap_content" android:stretchColumns="*"
    android:background="#ff0000">
    <TableRow android:layout_margin="1dp">
    <TextView android:text="first column" android:background="#000000"
    android:layout_margin="1dp" />
    <TextView android:text="second column" android:background="#000000"
    android:layout_margin="1dp" />
    </TableRow>
    ...
    </TableLayout>
    Creating Table Layout using textView and Table Border :
    <?xml version="1.0" encoding="utf-8"?>


    <TableLayout
    xmlns:android="http://schemas.android.com/apk/res/android"
    android:layout_width="wrap_content"
    android:layout_height="wrap_content"
    android:stretchColumns="*"
    android:background="#000000">
    <TableRow android:layout_margin="1dip">
    <TextView android:text="Invoice Number"  
    android:background="#ffffff" 
    android:layout_margin="1dip"  
    android:padding="15dip"/>
    <TextView android:id="@+id/tIN" android:text="9912326989" 
    android:background="#ffffff" android:layout_margin="1dip"  
    android:padding="15dip" />
    </TableRow>
    <TableRow 
    android:layout_margin="1dip">
     
    <TextView android:text="Invoice Data"
    android:background="#ffffff"
    android:layout_margin="1dip"
    android:padding="15dip" />
    <TextView android:id="@+id/Idata" 
    android:text="demo data" android:background="#ffffff" 
    android:layout_margin="1dip" android:padding="15dip" />
    </TableRow>
    <TableRow android:layout_margin="1dip">
    <TextView android:text="Operation Type" 
    android:background="#ffffff" android:layout_margin="1dip"
    android:padding="15dip" />
    <TextView android:id="@+id/tOT" 
    android:text="ok" android:background="#ffffff"
    android:layout_margin="1dip" android:padding="15dip" />
    </TableRow>
    <TableRow android:layout_margin="1dip">
    <TextView android:text="amount" 
    android:background="#ffffff" android:layout_margin="1dip"
    android:padding="15dip" />
    <TextView android:id="@+id/tAmount"
    android:text="Paid" 
    android:background="#ffffff"
    android:layout_margin="1dip"
    android:padding="15dip" />
    </TableRow>
    <TableRow android:layout_margin="1dip">
    <TextView android:text="Payment"  
    android:background="#ffffff"
    android:layout_margin="1dip"
    android:padding="15dip" />
    <TextView android:id="@+id/tPay"
    android:text="20000rs" android:background="#ffffff"
    android:layout_margin="1dip" android:padding="15dip" />
    </TableRow>
    <TableRow android:layout_margin="1dip">
    <TextView android:text="Usual Payment Type" 
    android:singleLine="false" android:background="#ffffff"
    android:layout_margin="1dip" android:padding="15dip" />
    <TextView android:id="@+id/amount" android:text="normal" 
    android:background="#ffffff" android:layout_margin="1dip" 
    android:padding="15dip" />
    </TableRow>
    </TableLayout>


    For Complete Source Code Click here

    Jumat, 04 Maret 2011

    Multicolumn ListView in Android

    Ever since I started programming on the Android platform, I have been wondering when the SDK would include a ready-made multicolumn ListView (or listbox as it is often called in other frameworks). One could of course construct such a thing by slapping regular ListViews side by side and then painfully adding code to keep them all in sync when scrolled and so on. It felt such a hack that I used GridView instead. GridView is not really a great list, though, because the cells will all be formatted the same. There are other issues besides that, but for me that was the main one.
    I finally saw a blog post which customized ListView to put Three TextViews vertically into one line. It was pretty simple going from there to one that would display three TextViews side-by-side. The main layout XML file could define ListView something like this:
    <!-- main.xml -->
    <?xml version="1.0" encoding="utf-8"?>
    <LinearLayout xmlns:android="http://schemas.android.com/apk/res/android"
    android:orientation="vertical"
    android:layout_width="fill_parent"
    android:layout_height="fill_parent"
    >
    <ListView
    android:id="@+id/lv"
    android:layout_width="wrap_content"
    android:layout_height="wrap_content"
    />
    </LinearLayout>
    Here is the XML for each row, main point being that we put three TextViews in LinearLayout with horizontal orientation:
    <?xml version="1.0" encoding="utf-8"?>
    <!-- row.xml -->
    <?xml version="1.0" encoding="UTF-8"?>
    <LinearLayout xmlns:android="http://schemas.android.com/apk/res/android"
    android:orientation="horizontal"
    android:paddingTop="4dip"
    android:paddingBottom="6dip"
    android:layout_width="fill_parent"
    android:layout_height="fill_parent">
    <TextView
    android:id="@+id/t1"
    android:layout_width="90dip"
    android:layout_height="wrap_content"
    android:text="text1"/>
    <TextView
    android:id="@+id/t2"
    android:layout_width="90dip"
    android:layout_height="wrap_content"
    android:layout_weight="1"
    android:text="text2"/>
    <TextView
    android:id="@+id/t3"
    android:layout_width="50dip"
    android:layout_height="wrap_content"
    android:layout_weight="1"
    android:text="text3" />
    </LinearLayout>
    Notice how you can format each TextView separately. There is no column separator, but something decent should not be too hard to whip up if desired. My understanding is that the screen width is supposed to be 160 dip, but for some reason I had to use width values that actually add up to more than that, as well as using layout weight to grow some fields proportionally so that when you switch to landscape mode things are still nicely aligned. I would have expected specifying widths in dip would have automatically done that.
    Here is how you could populate that ListView with data:
    ListView list =getListView();
     
    Main class :
    -------------
    import java.util.ArrayList;
    import java.util.Calendar;
    import java.util.Date;
    import java.util.HashMap;
    import android.app.ListActivity;
    import android.os.Bundle;
    import android.util.Log;
    import android.widget.ListView;
    import android.widget.SimpleAdapter;
    public class MultiList extends ListActivity {
       
        ListView lv;
        SimpleAdapter sd;
          @Override
        public void onCreate(Bundle savedInstanceState) {
            try {
            super.onCreate(savedInstanceState);
           Calendar c=Calendar.getInstance();
           lv=getListView();
            ArrayList<HashMap<String,String>> alist=new ArrayList<HashMap<String,String>>();
            HashMap<String, String>map=new HashMap<String, String>();
            map.put("Date","Date :"+c.get(Calendar.DATE));  // printing date
            map.put("Month", "Month :"+(c.get(Calendar.MONTH)+1)); // printing month
            map.put("Time", "Time :"+new Date().toString());  // printing Date
            alist.add(map);
            sd=new SimpleAdapter(this,alist,R.layout.rows,new String[]{"Date","Month","Time"},new int[]{R.id.t1,R.id.t2,R.id.t3});
            lv.setAdapter(sd);
            }
            catch (Exception e) {
                Log.w("Sravan", e.toString());
            }
        }
    }
    The main point here is that the SimpleAdapter requires the data to be in a List, where each entry is a Map. In my case, I simulate the columns by putting in three entries into each of the maps, and the maps each have the same keys. The adapter then maps the key values (like "Date") to the corresponding TextView (R.id.t1).
    Putting the above pieces of code into Caltroid produces results that look like this:

    Final Screen  For Complete Project Source code Click Here