Rabu, 17 Februari 2010

Map Implementation

1. Open Command Prompt and generate using eh keytool


You can the debug.keystore path

> Open Eclipse-> Windows>Preferences>Android>Build


Run the Following command with keystore

> keytool -list -keystore <debug.keystore path>


  1. Register the Certificate fingerprint and get the map view along with api key


Go To http://code.google.com/android/maps-api-signup.html and place your certification key


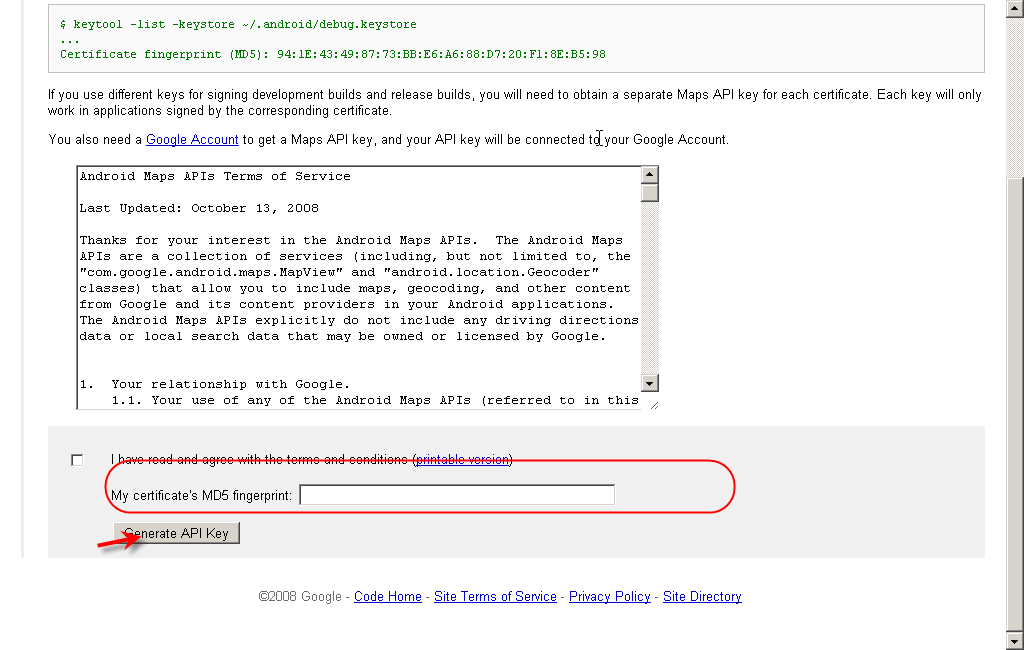
Register your certification along with your google account.

You can get the Following Data

Thank you for signing up for an Android Maps API key!

Your key is:

<< COPY THE API KEY>>

This key is good for all apps signed with your certificate whose fingerprint is:


CERTIFICATION FINGER PRINTS

Here is an example xml layout to get you started on your way to mapping glory:


<com.google.android.maps.MapView android:layout_width="fill_parent" android:layout_height="fill_parent" android:apiKey="||API KEY||"/>


3. Create a map based android project.


1. Eclipse > New Project > Android Project > Select Google Map 1.5


4. Place MapView in the layout


  1. Create a class extends the MapActivity class

public class MainActivity extends MapActivity {

/** Called when the activity is first created. */

@Override

public void onCreate(Bundle savedInstanceState) {

super.onCreate(savedInstanceState);

setContentView(R.layout.main);

}


@Override

protected boolean isRouteDisplayed() {

// TODO Auto-generated method stub

return false;

}

}


  1. Create a GeoPoint, MapView and MapController instance.


double latitude = 10.47, longitude = 79.10;

GeoPoint geoPoint = new GeoPoint((int) (latitude * 1000000),

(int) (longitude * 1000000));


MapView myMapView = (MapView) findViewById(R.id.myGMap);

myMapView.setSatellite(false);

myMapView.setBuiltInZoomControls(true);

myMapView.displayZoomControls(true);


MapController myMC = = myMapView.getController();

myMC.setCenter(geoPoint);

myMC.setZoom(15);


Need to Add the User Permission


<uses-permission android:name="android.permission.ACCESS_COARSE_LOCATION"></uses-permission>


<uses-permission android:name="android.permission.ACCESS_FINE_LOCATION"></uses-permission>


<uses-permission android:name="android.permission.INTERNET"></uses-permission>


Need to Add the lib


<application android:icon="@drawable/icon" android:label="@string/app_name">

<uses-library android:name="com.google.android.maps" />

.......

</application>


Hope this is helpful for you


Selasa, 16 Februari 2010

Reuse the android existing applications

There are many applications that can be reused by custom built applications because of the power of the android design that is based on implicit intents.
In this blog we are taking about the reuse the existing android application.

1. Create a application an android project.
2. Copy the any one of following code and paste into the onCreate() in mainactivity
3. Place the appropriate permission in the Androidmainfeast.xml file.

Call Function
Permission : android:name="android.permission.CALL_PHONE"
Code : 1. Call a number
Intent callNumber = new Intent();
callNumber.setAction(android.content.Intent.ACTION_CALL);
callNumber.setData(Uri.parse("tel:9789039333"));
startActivity(callNumber);


2. Browse the web for a given url:
Permission : android:name="android.permission.INTERNET"
Code :
Intent searchGivenText = new Intent(Intent.ACTION_WEB_SEARCH);
searchGivenText.putExtra(SearchManager.QUERY, "Android + Ganesan shanmugam");
startActivity(searchGivenText);


3. View google maps for a given location
Permission :android:name="android.permission.INTERNET"
Code :
Intent searchAddress = new Intent(Intent.ACTION_VIEW,
Uri.parse("geo:0,0?q=Bangalore"));
startActivity(searchAddress);


4. View Contacts on the phone
Permission : android:name="android.permission.READ_CONTACTS"
Intent contacts = new Intent();
contacts.setAction(android.content.Intent.ACTION_VIEW);
contacts.setData(People.CONTENT_URI);
startActivity(contacts);


Sabtu, 13 Februari 2010

Create a Custom Dialog

This article helps to creating a custom dialog box.

1. Create a Layout.xml for customDialog
Create a new layout which contains the view. in this example i have used edittext and button.


<?xml version="1.0" encoding="utf-8"?>
<LinearLayout xmlns:android="http://schemas.android.com/apk/res/android"
    android:layout_width="wrap_content" android:layout_height="wrap_content">

    <EditText android:id="@+id/EditText01" android:layout_height="wrap_content" android:text="Enter your name" android:layout_width="250dip"></EditText>

    <Button android:id="@+id/Button01" android:layout_width="wrap_content"
        android:layout_height="wrap_content" android:text="click"></Button>

</LinearLayout>


2. Create a Custom Dialog Class.
a. Create a class extends the dialog class
b. Create a Event Handler Interface as a member
c. Use the custom layout in onCreate Method.

public class MyCustomDialog extends Dialog {

    public interface ReadyListener {
        public void ready(String name);
    }

    private String name;
    private ReadyListener readyListener;
    EditText etName;

    public MyCustomDialog(Context context, String name,
            ReadyListener readyListener) {
        super(context);
        this.name = name;
        this.readyListener = readyListener;
    }

    @Override
    public void onCreate(Bundle savedInstanceState) {
        super.onCreate(savedInstanceState);
        setContentView(R.layout.mycustomdialog);
        setTitle("Enter your Name ");
        Button buttonOK = (Button) findViewById(R.id.Button01);
        buttonOK.setOnClickListener(new OKListener());
        etName = (EditText) findViewById(R.id.EditText01);
    }

    private class OKListener implements android.view.View.OnClickListener {
        @Override
        public void onClick(View v) {
            readyListener.ready(String.valueOf(etName.getText()));
            MyCustomDialog.this.dismiss();
        }
    }

}


3. Create a MainActivity and Implement the CustomDialog
public class MainActivity extends Activity {
    /** Called when the activity is first created. */
    @Override
    public void onCreate(Bundle savedInstanceState) {
        super.onCreate(savedInstanceState);
        setContentView(R.layout.main);
        MyCustomDialog myDialog = new MyCustomDialog(this, "",
                new OnReadyListener());
        myDialog.show();
    }
    private class OnReadyListener implements MyCustomDialog.ReadyListener {
        @Override
        public void ready(String name) {
            Toast.makeText(MainActivity.this, name, Toast.LENGTH_LONG).show();
        }
    }
}